Stock Requests and Voyages
How a trader or farmer agrees a volume with a terminal, nominates trucks against it, and decides the fate of those that fail the quality check. Section Stocks, route /stocks.
How the process works
A single truck visit to a terminal is seen by three parties, and each works in its own section of the platform. The steps run in sequence: until whoever’s turn it is takes their step, the truck waits.
| # | Stage | Trader / farmer | Terminal | Laboratory |
|---|---|---|---|---|
| 1 | Volume request | creates it | — | — |
| 2 | Truck nomination | nominates the truck | sees “Scheduled” | sees the truck in its list |
| 3 | Truck arrives | — | receives it on site | — |
| 4 | Quality parameters | — | enters them if no lab is set | enters them if assigned |
| 5 | Quality out of specification | allows or rejects | waits | — |
| 6 | Weighing and closing | — | weighs and closes the visit | — |
Step 4 is a fork. By default the terminal takes the sample and enters the parameters itself. If an independent assessment is needed, you assign an external laboratory to the request: the surveyor then enters the parameters and the terminal only has to weigh the truck.
This page is for the cargo owner. The other two parties need their own: Terminal Passes — for the elevator or transshipment facility · Laboratory: Quality Check — for the surveyor.
Three entities
| Entity | What it is | Where it lives |
|---|---|---|
| Request | An agreement with the terminal on volume: “1,000 t of wheat will arrive” | Stocks → terminal → My Requests |
| Voyage | One truck inside the request: its plate, driver, waybill, weight, quality | Request card → Delivery tab |
| Pass | The same voyage as the terminal sees it — one truck visit to the site | The terminal’s section, read-only for you |
A request is tonnes; a voyage is a truck. The terminal does not see your request as a document — it sees separate passes for each nominated truck.
Also:
- Terminal (site) — the elevator or transshipment facility where your goods are held. In Stocks it is the top-level card.
- Storage — a silo or bin inside the terminal. There can be several: “Storage 1”, “Storage 2”.
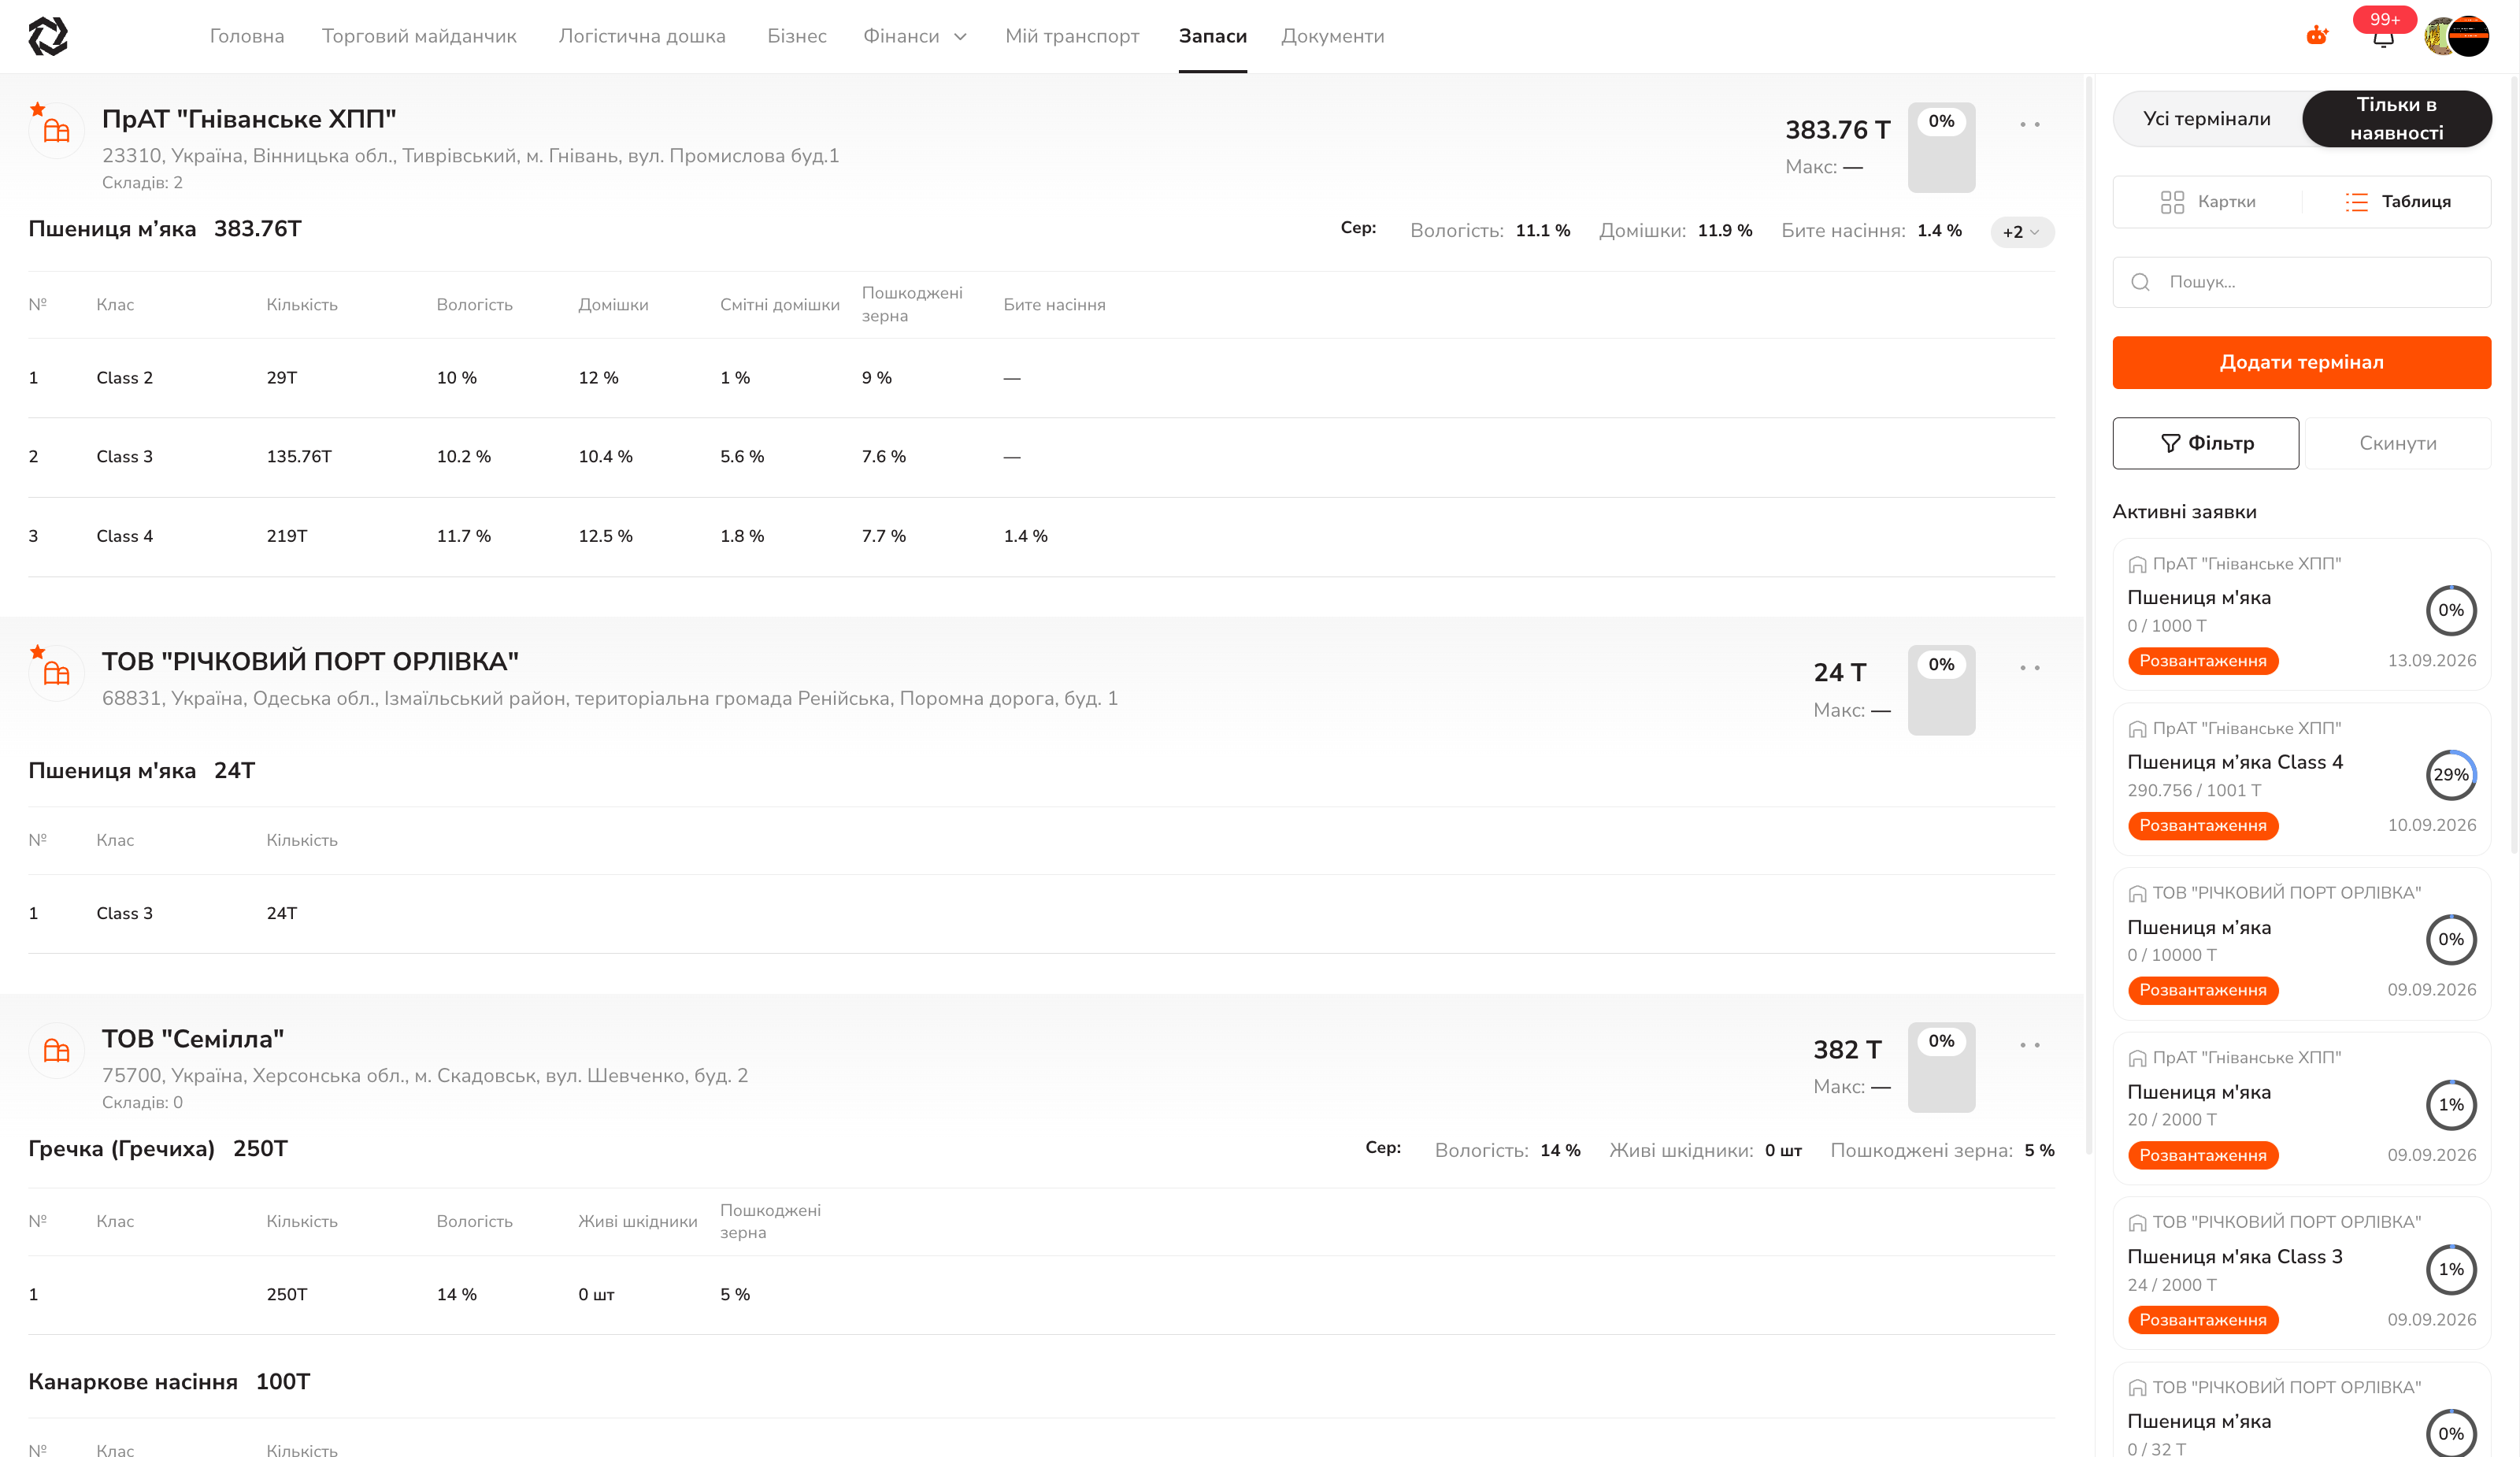
The Stocks section
Terminals with balances by commodity and class. On the right, the “Active requests” panel covers all sites at once.
Clicking a terminal name opens its card: the “Stocks”, “Transport History” and “My Requests” tabs, plus the “Create request” button.
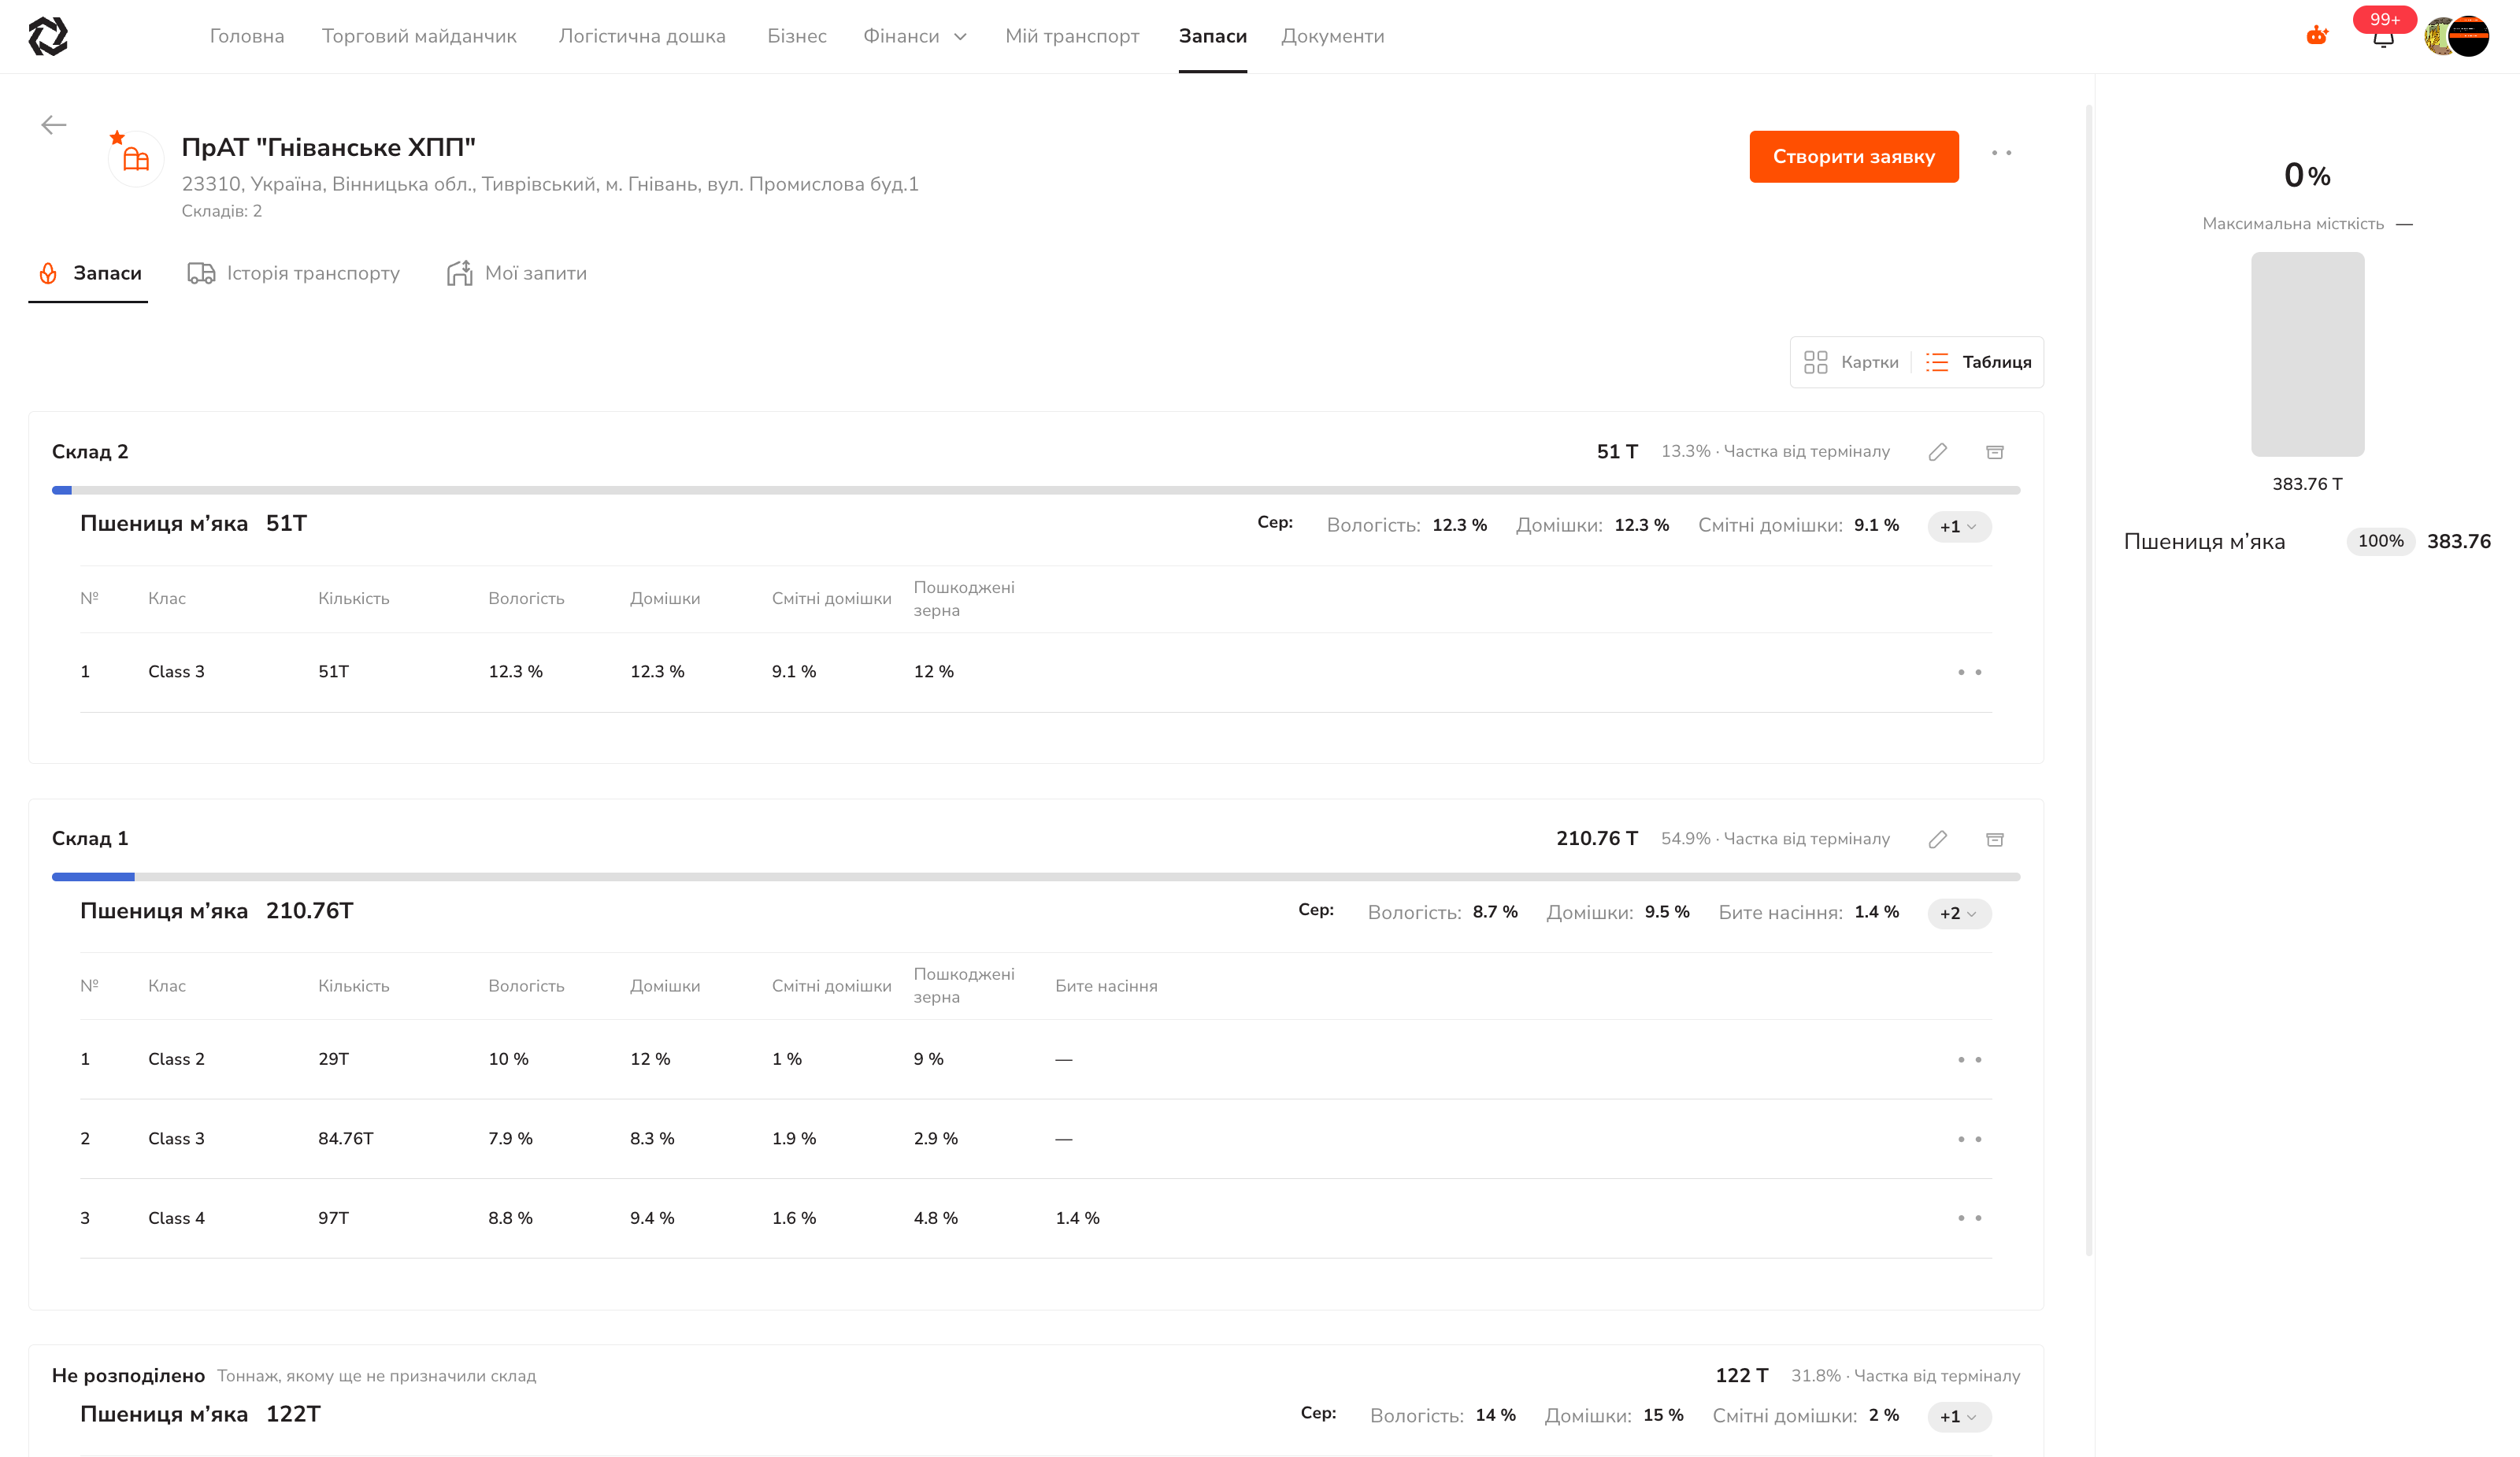
The “Unallocated” block is tonnage that has not yet been assigned to a storage inside the terminal.
Creating a request
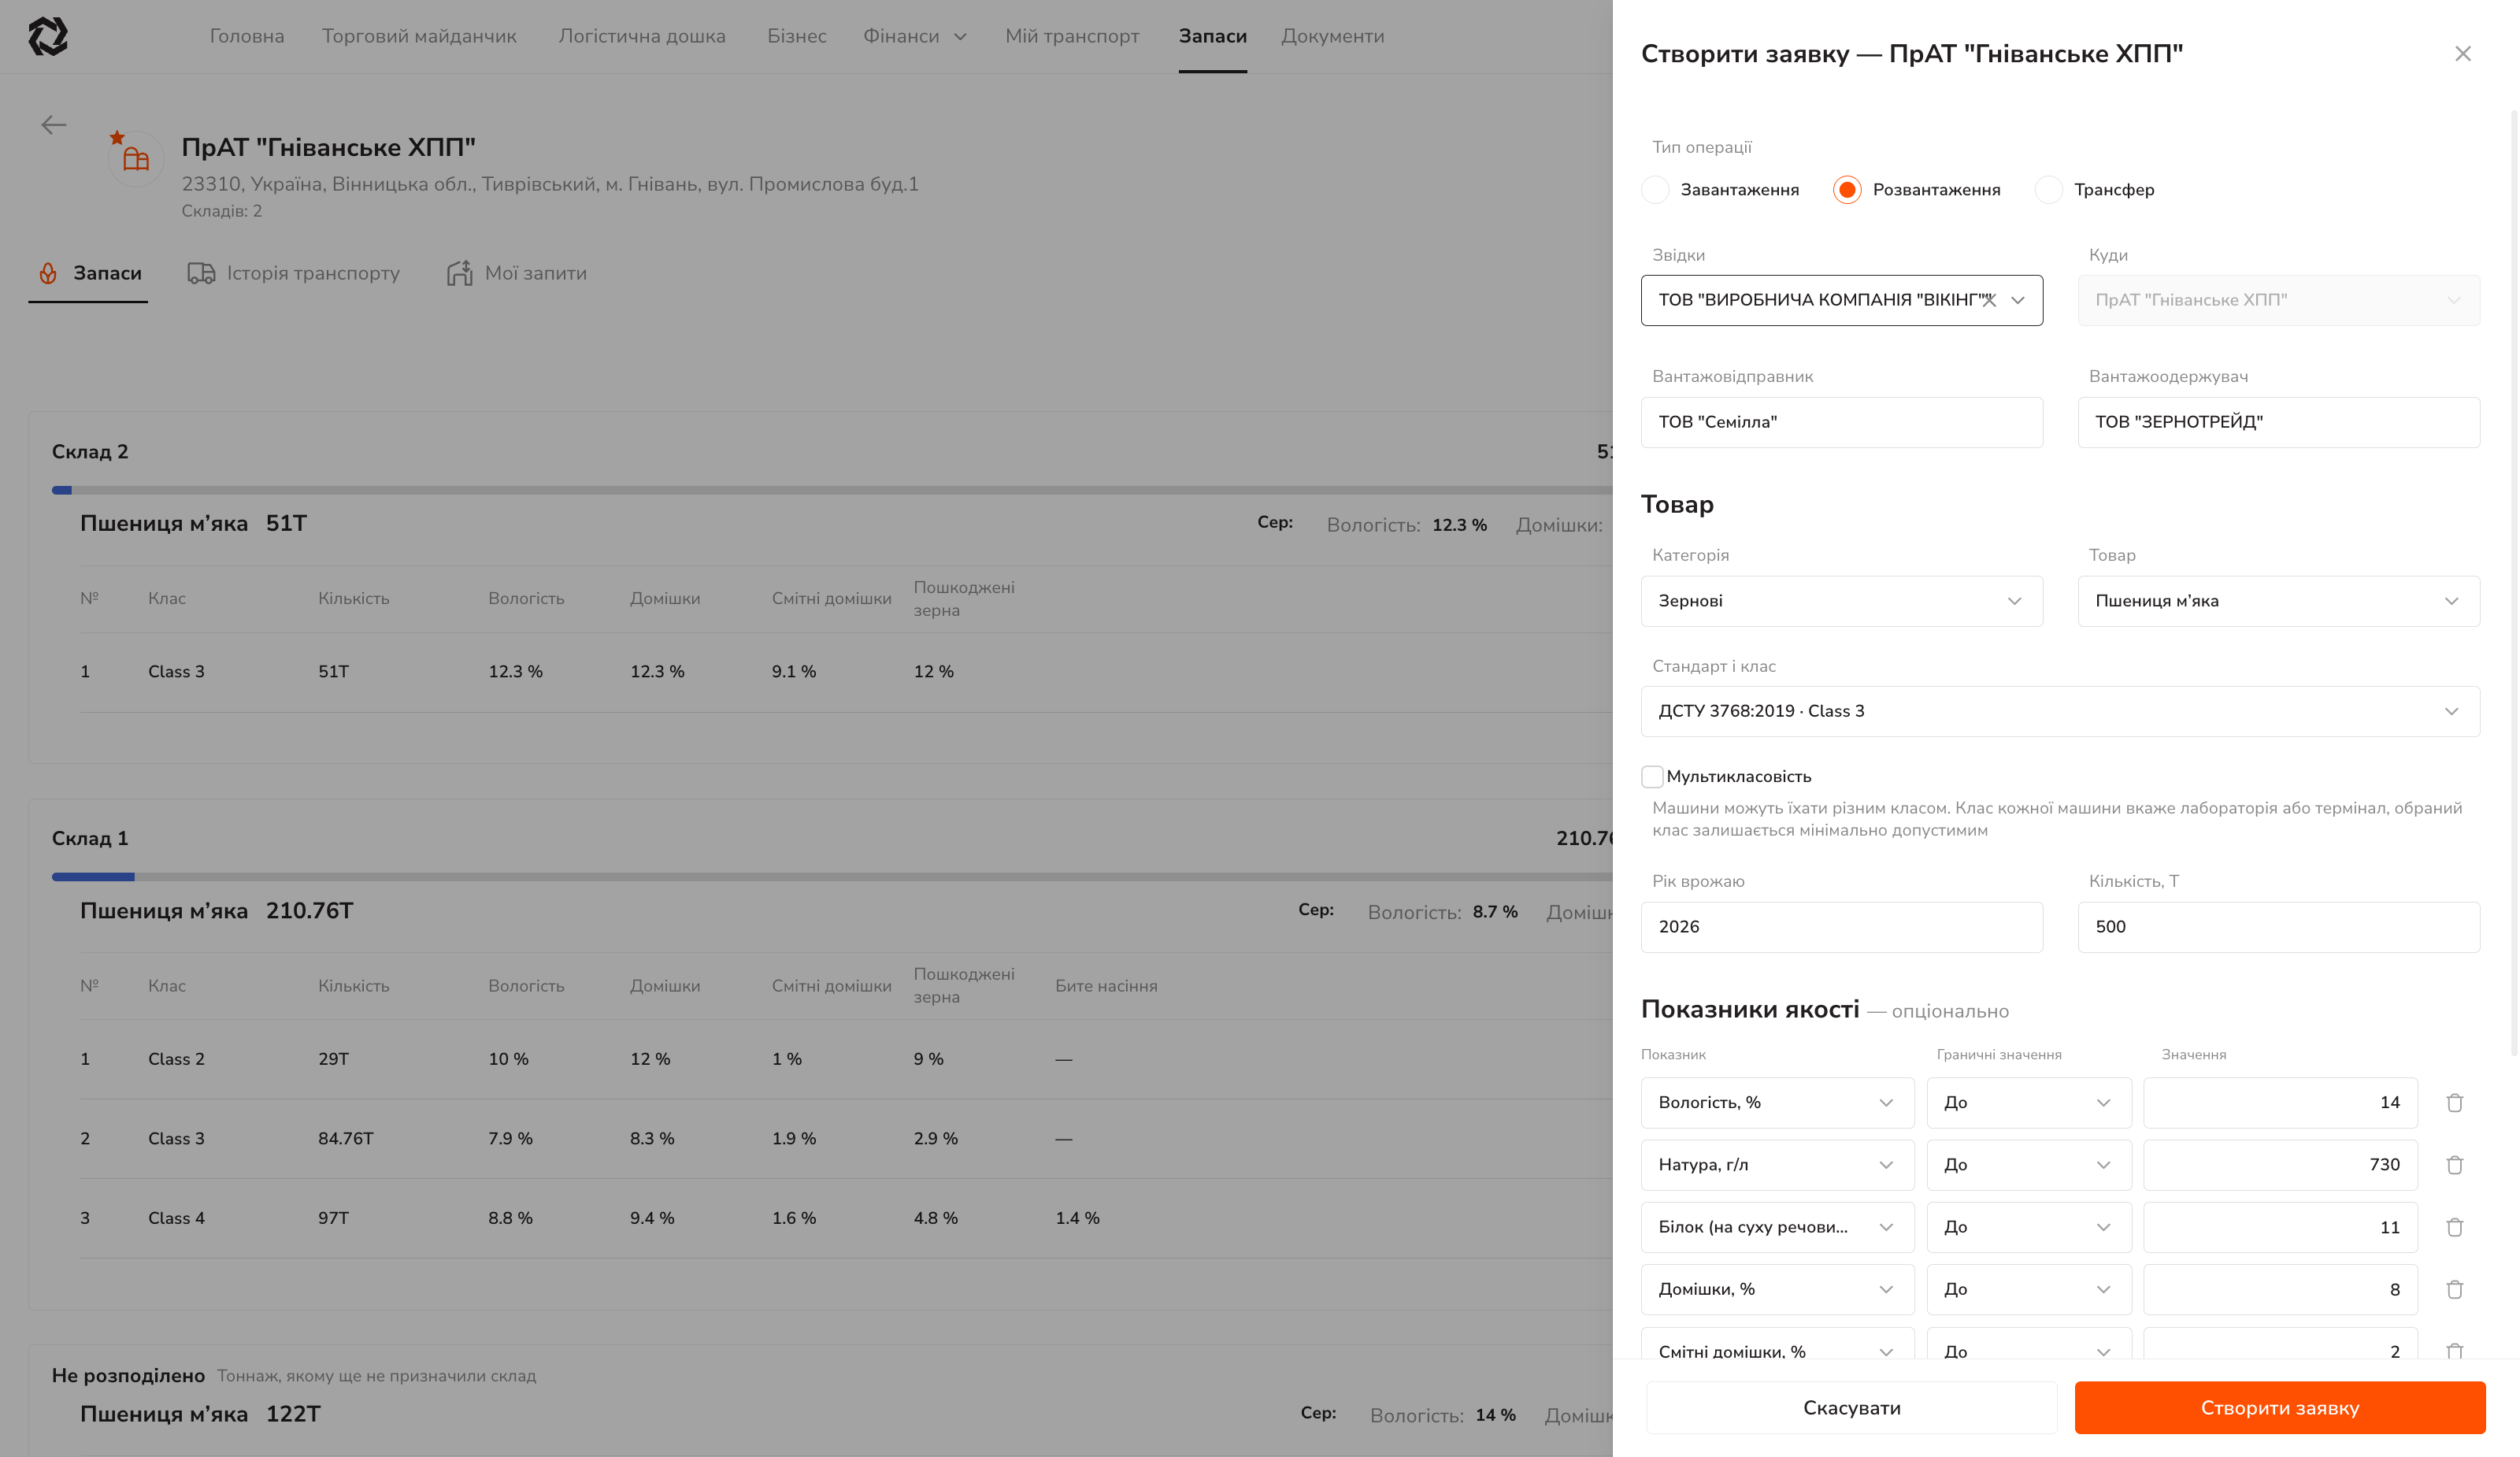
Operation type
| Type | What it means | Where the terminal goes |
|---|---|---|
| Loading | Goods are taken out of the terminal | into the From field |
| Unloading | Goods are brought into the terminal | into the To field |
| Transfer | Movement between sites | — |
The terminal you opened the form from is filled in automatically and cannot be edited — you pick the second site.
Points A and B are optional. If it is not yet known where the goods will travel from, leave the field empty — you will specify the point when nominating the truck.
Commodity
Category → Commodity → Standard and class (e.g. DSTU 3768:2019 · Class 3).
Once the standard is selected, the “Quality parameters” block is filled with limits automatically: moisture ≤ 14 %, test weight ≤ 730 g/l, protein ≤ 11 % and so on per the standard. Values can be edited, rows deleted, and ”+ Add parameter” adds your own.
The terminal or the laboratory will compare each truck’s actual quality against these figures. They determine whether the truck goes straight to the weighbridge or comes back to you for a decision.
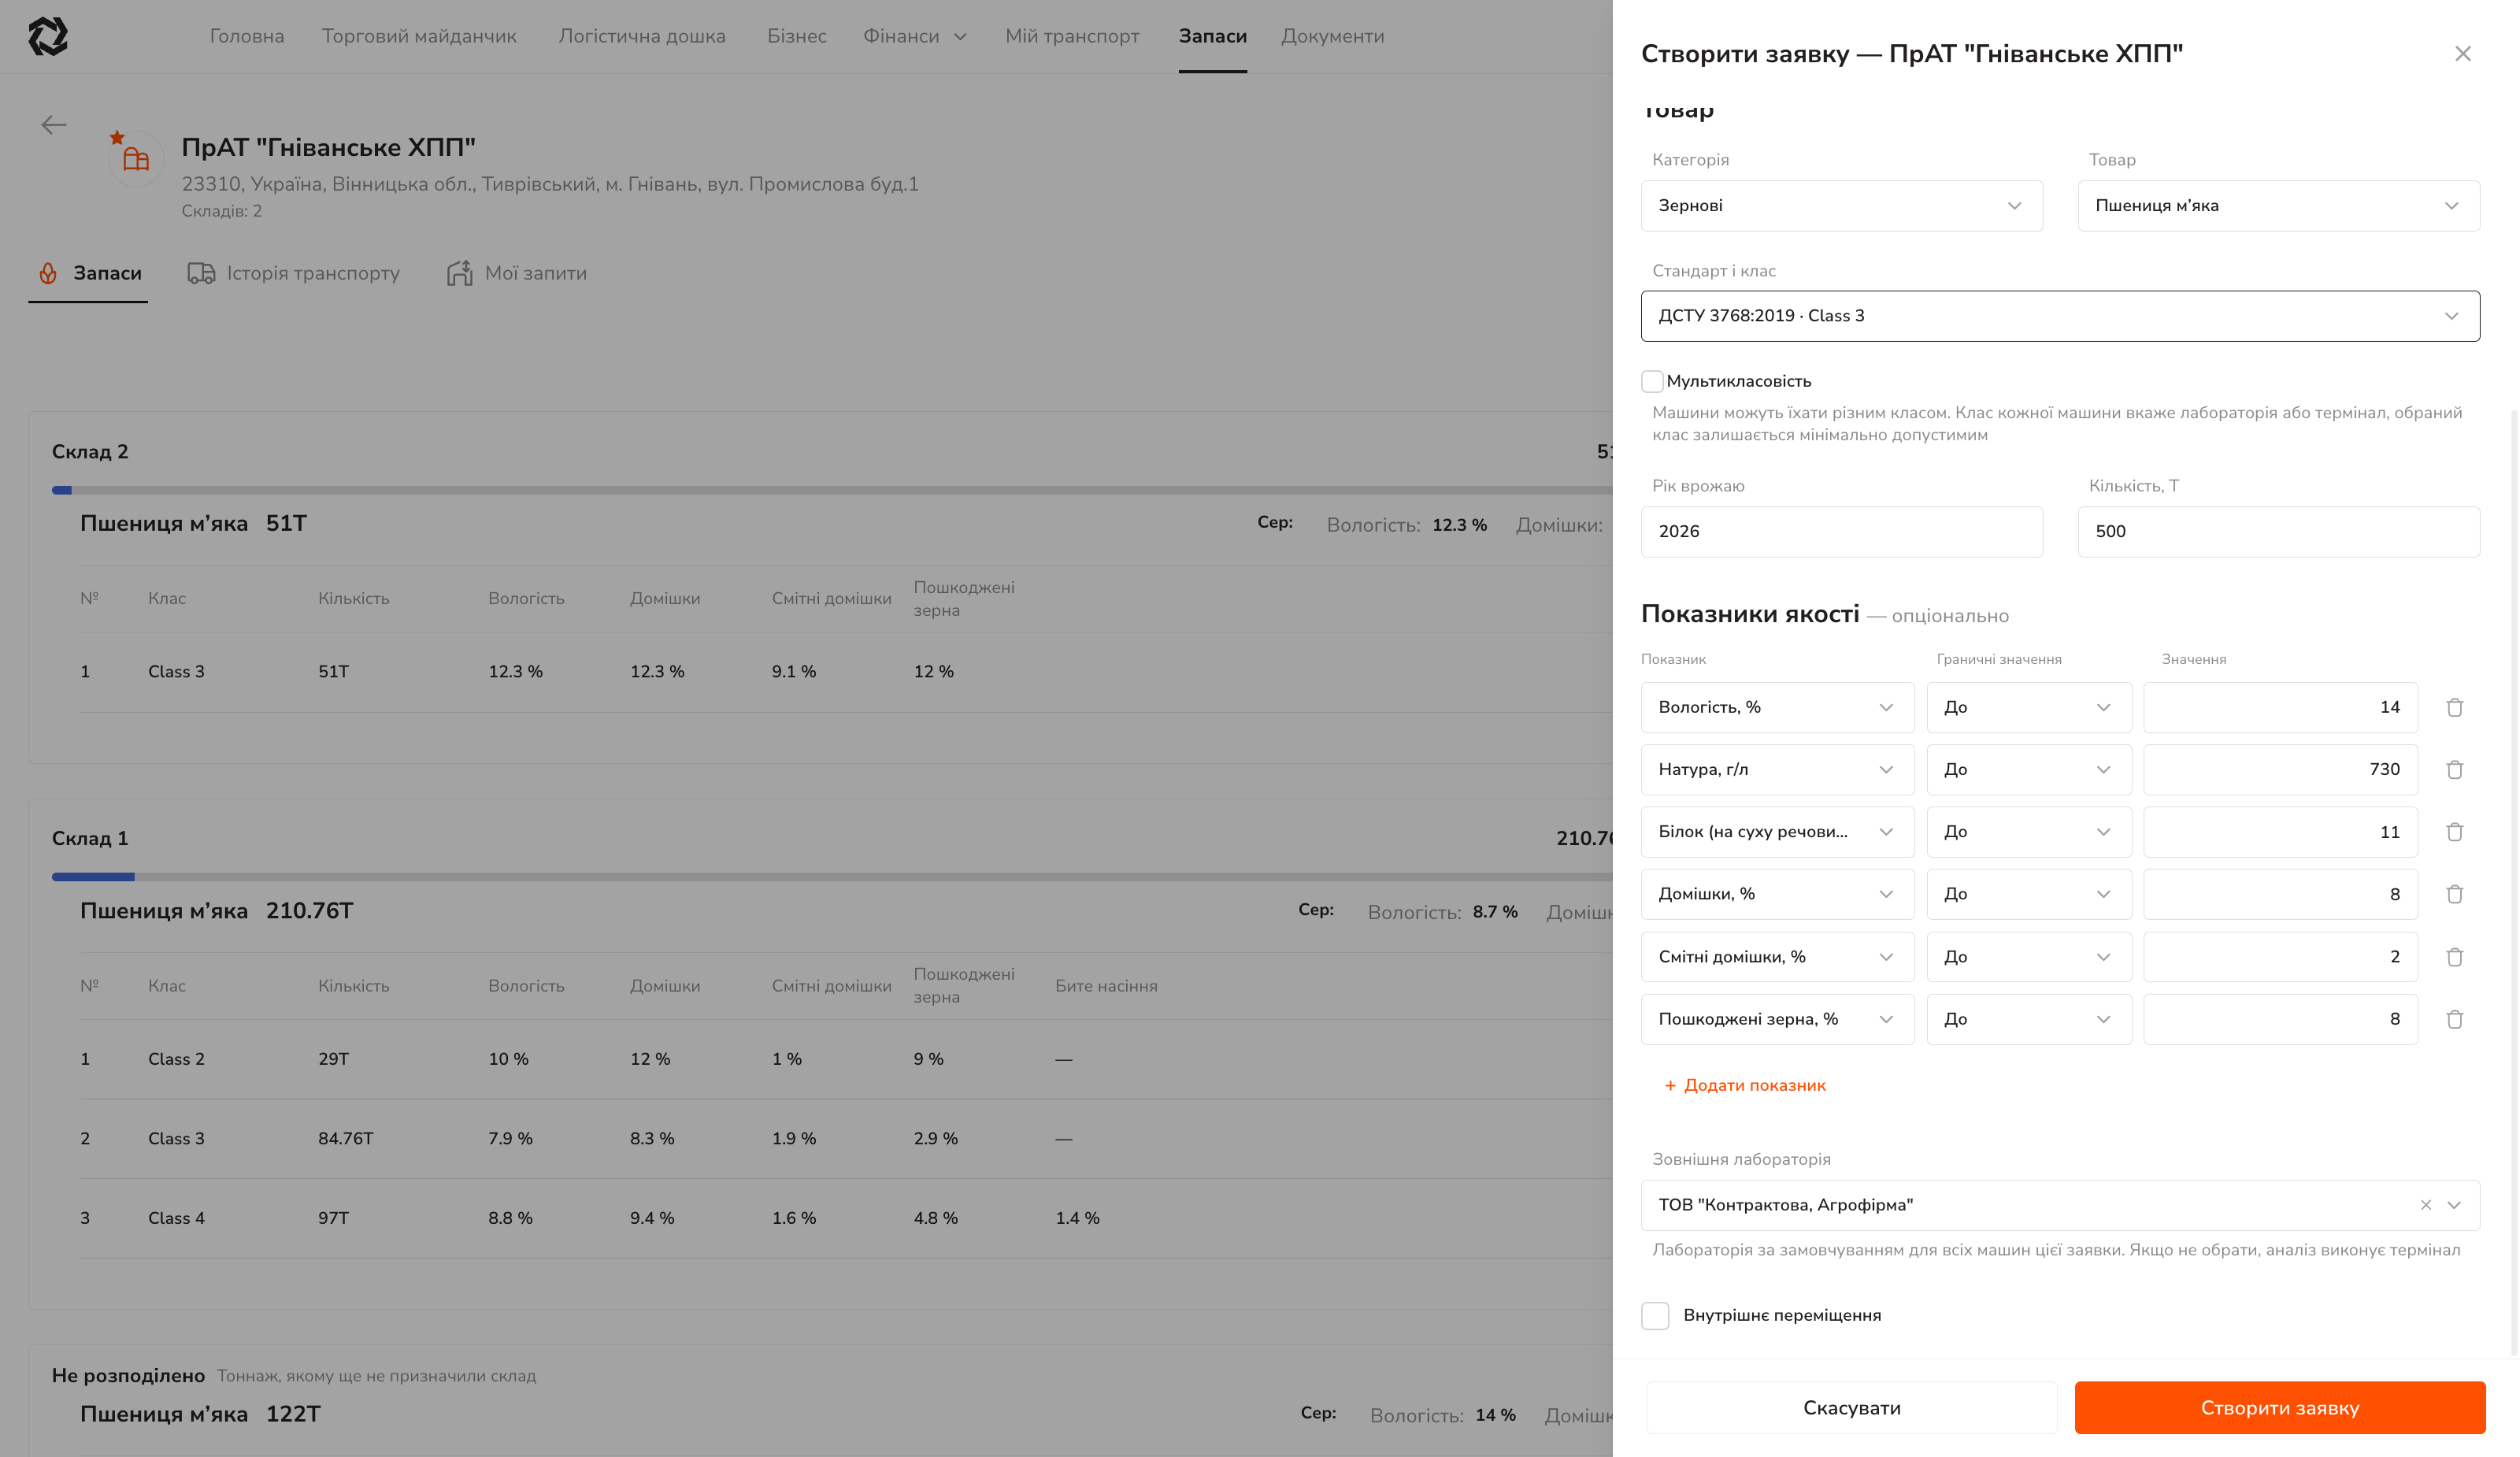
External laboratory
The “External laboratory” field in the form is the same fork as step 4. The hint below the field reads: “Default laboratory for all trucks in this request. If none is selected, the terminal performs the analysis”.
| Field value | Who enters the parameters | What the terminal does |
|---|---|---|
| Empty | The terminal | ”Enter quality” → “Enter weights” |
| A laboratory chosen | The surveyor | only “Enter weights” |
A laboratory can also be assigned or changed after the request is created — via the “External laboratory — + Add” row above the transport table in the request card. The surveyor’s workplace is described on the Laboratory: Quality Check page.
Remaining fields
| Field | What it does |
|---|---|
| Multi-class | Trucks may carry different classes. The selected class becomes the minimum acceptable threshold; each truck’s actual class is entered by the laboratory or the terminal |
| Harvest year | Required |
| Quantity, t | Required. This is the volume trucks are nominated against |
| Consignor / consignee | Free text, goes into the waybill |
The “Create request” button → the “Request created” toast, and the request joins the list with the Active status.
Request list
The “My Requests” tab.
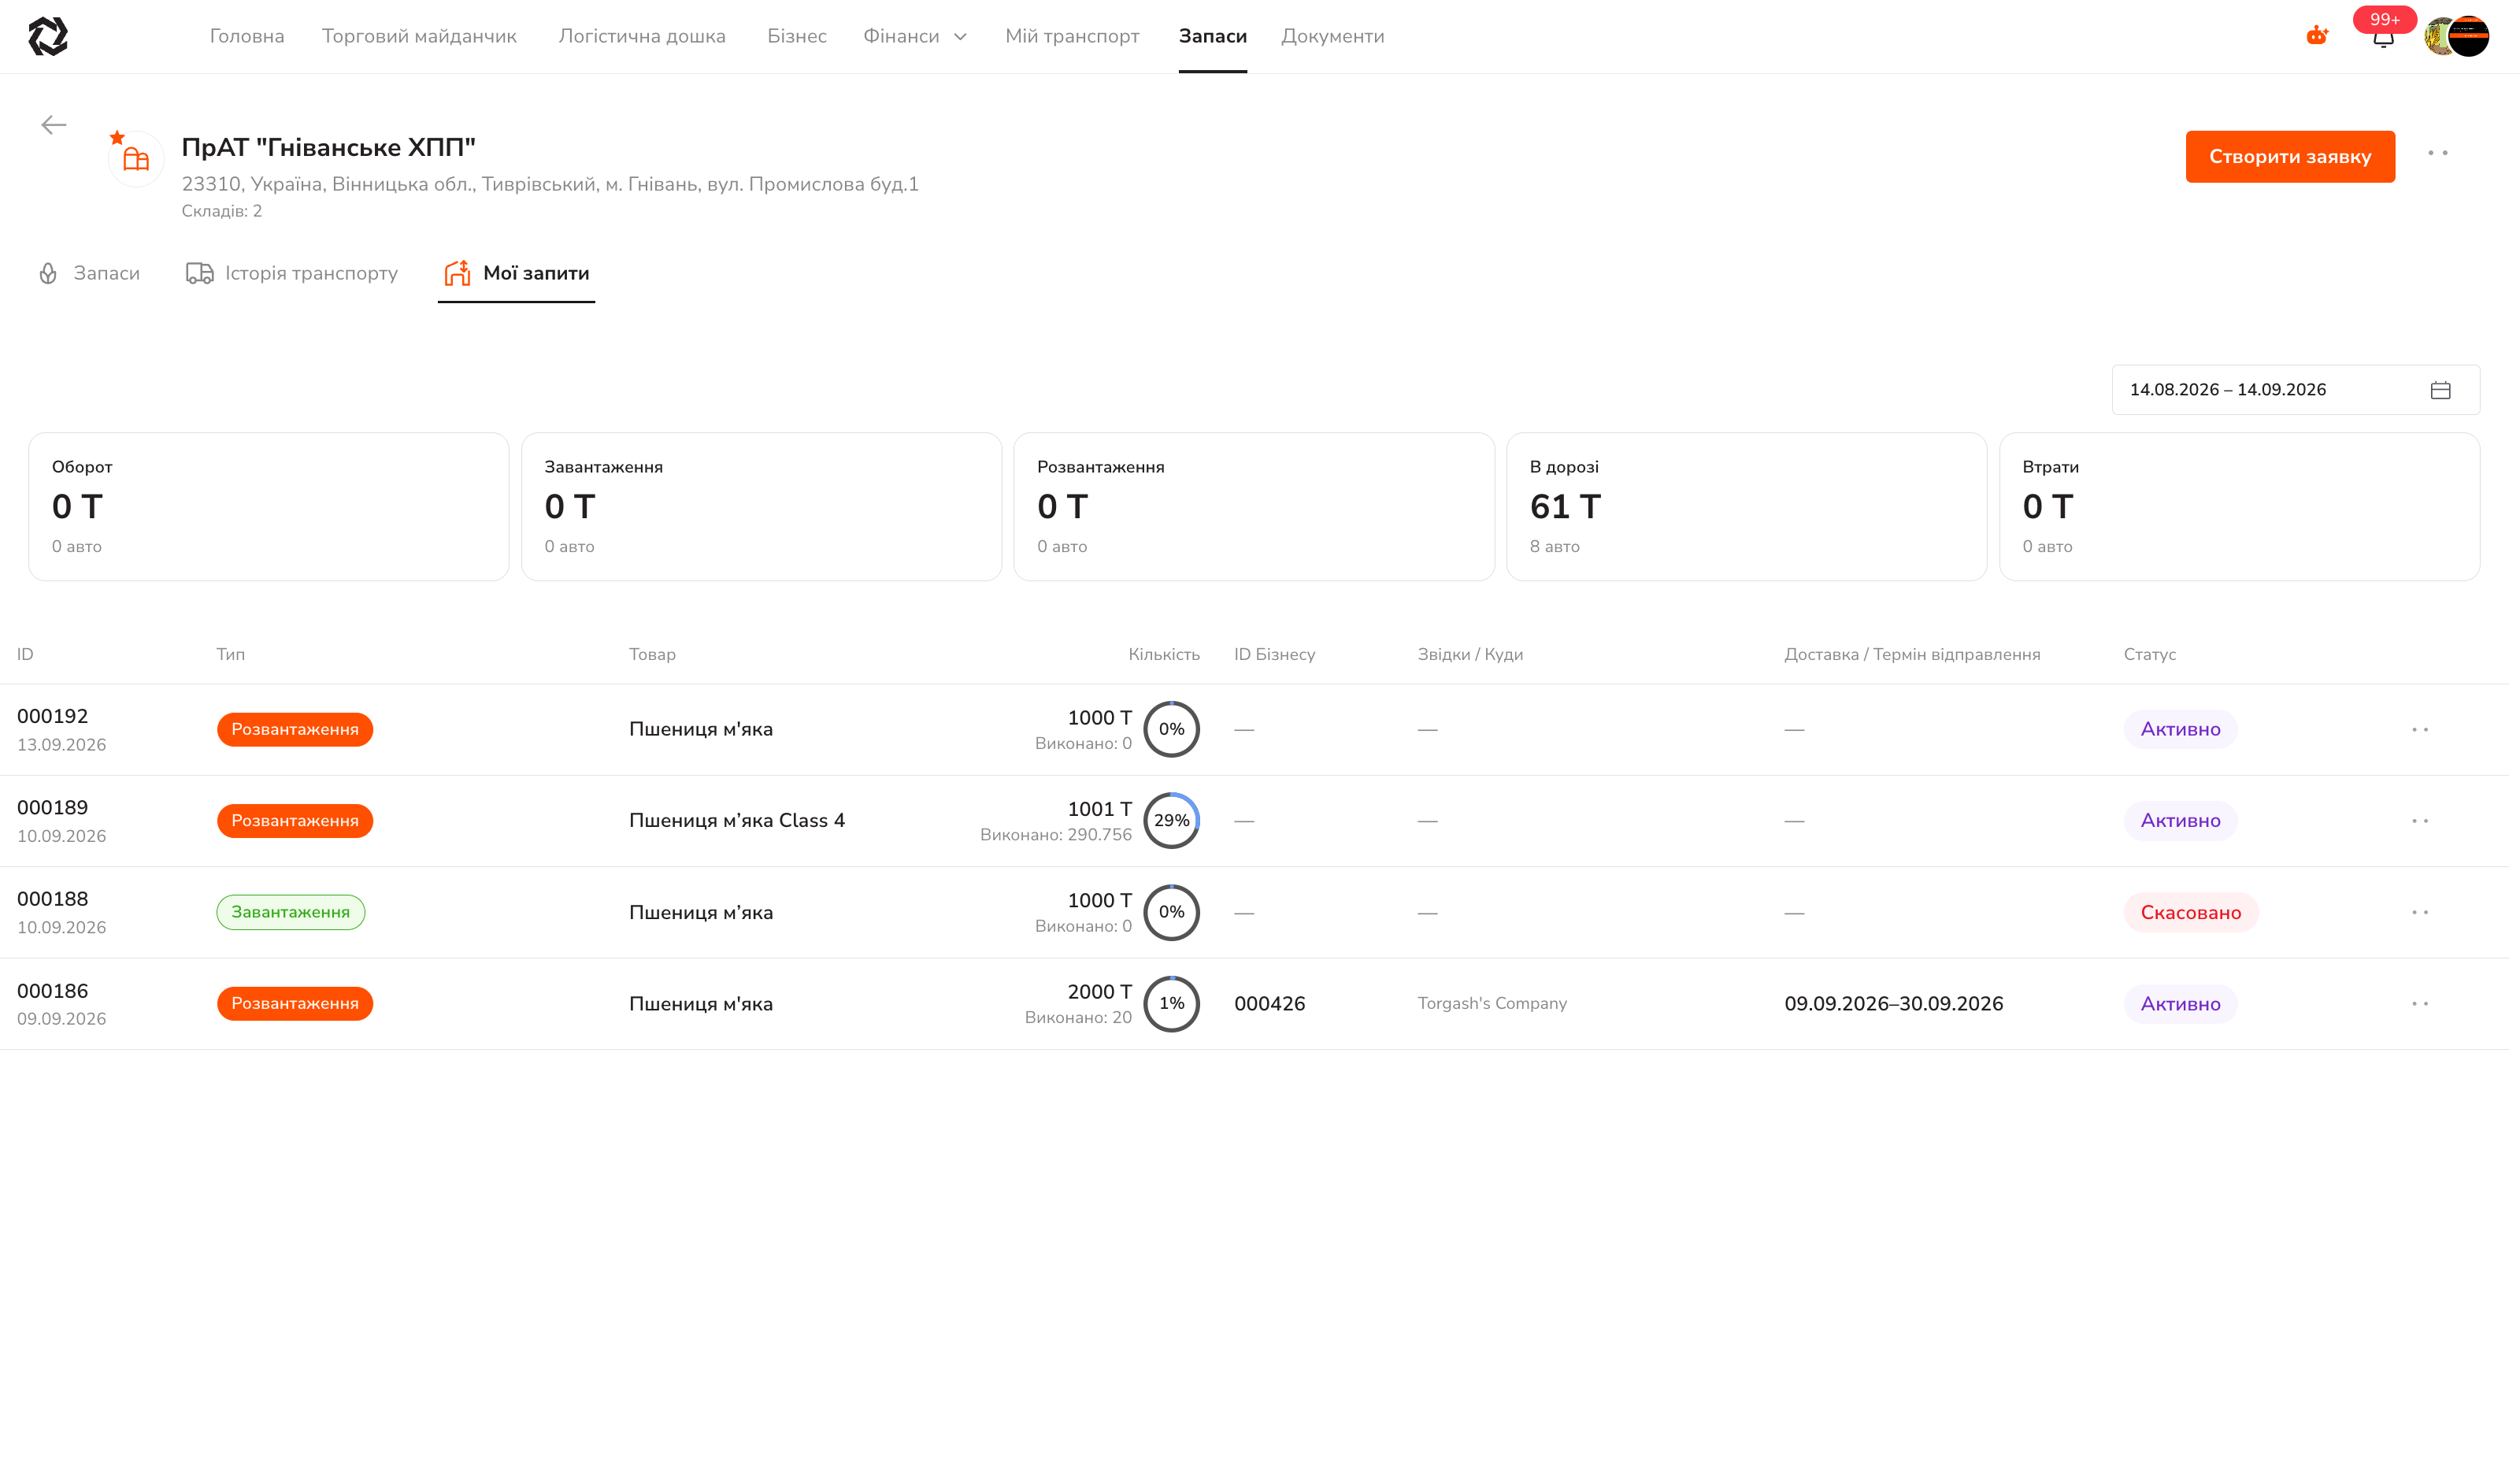
At the top is the summary for the period: Turnover, Loading, Unloading, In transit, Losses — in tonnes and trucks.
Request statuses: Active → Completed / Cancelled. Row actions in the ”···” menu: “Complete request”, “Cancel request” — both ask for confirmation.
Request card
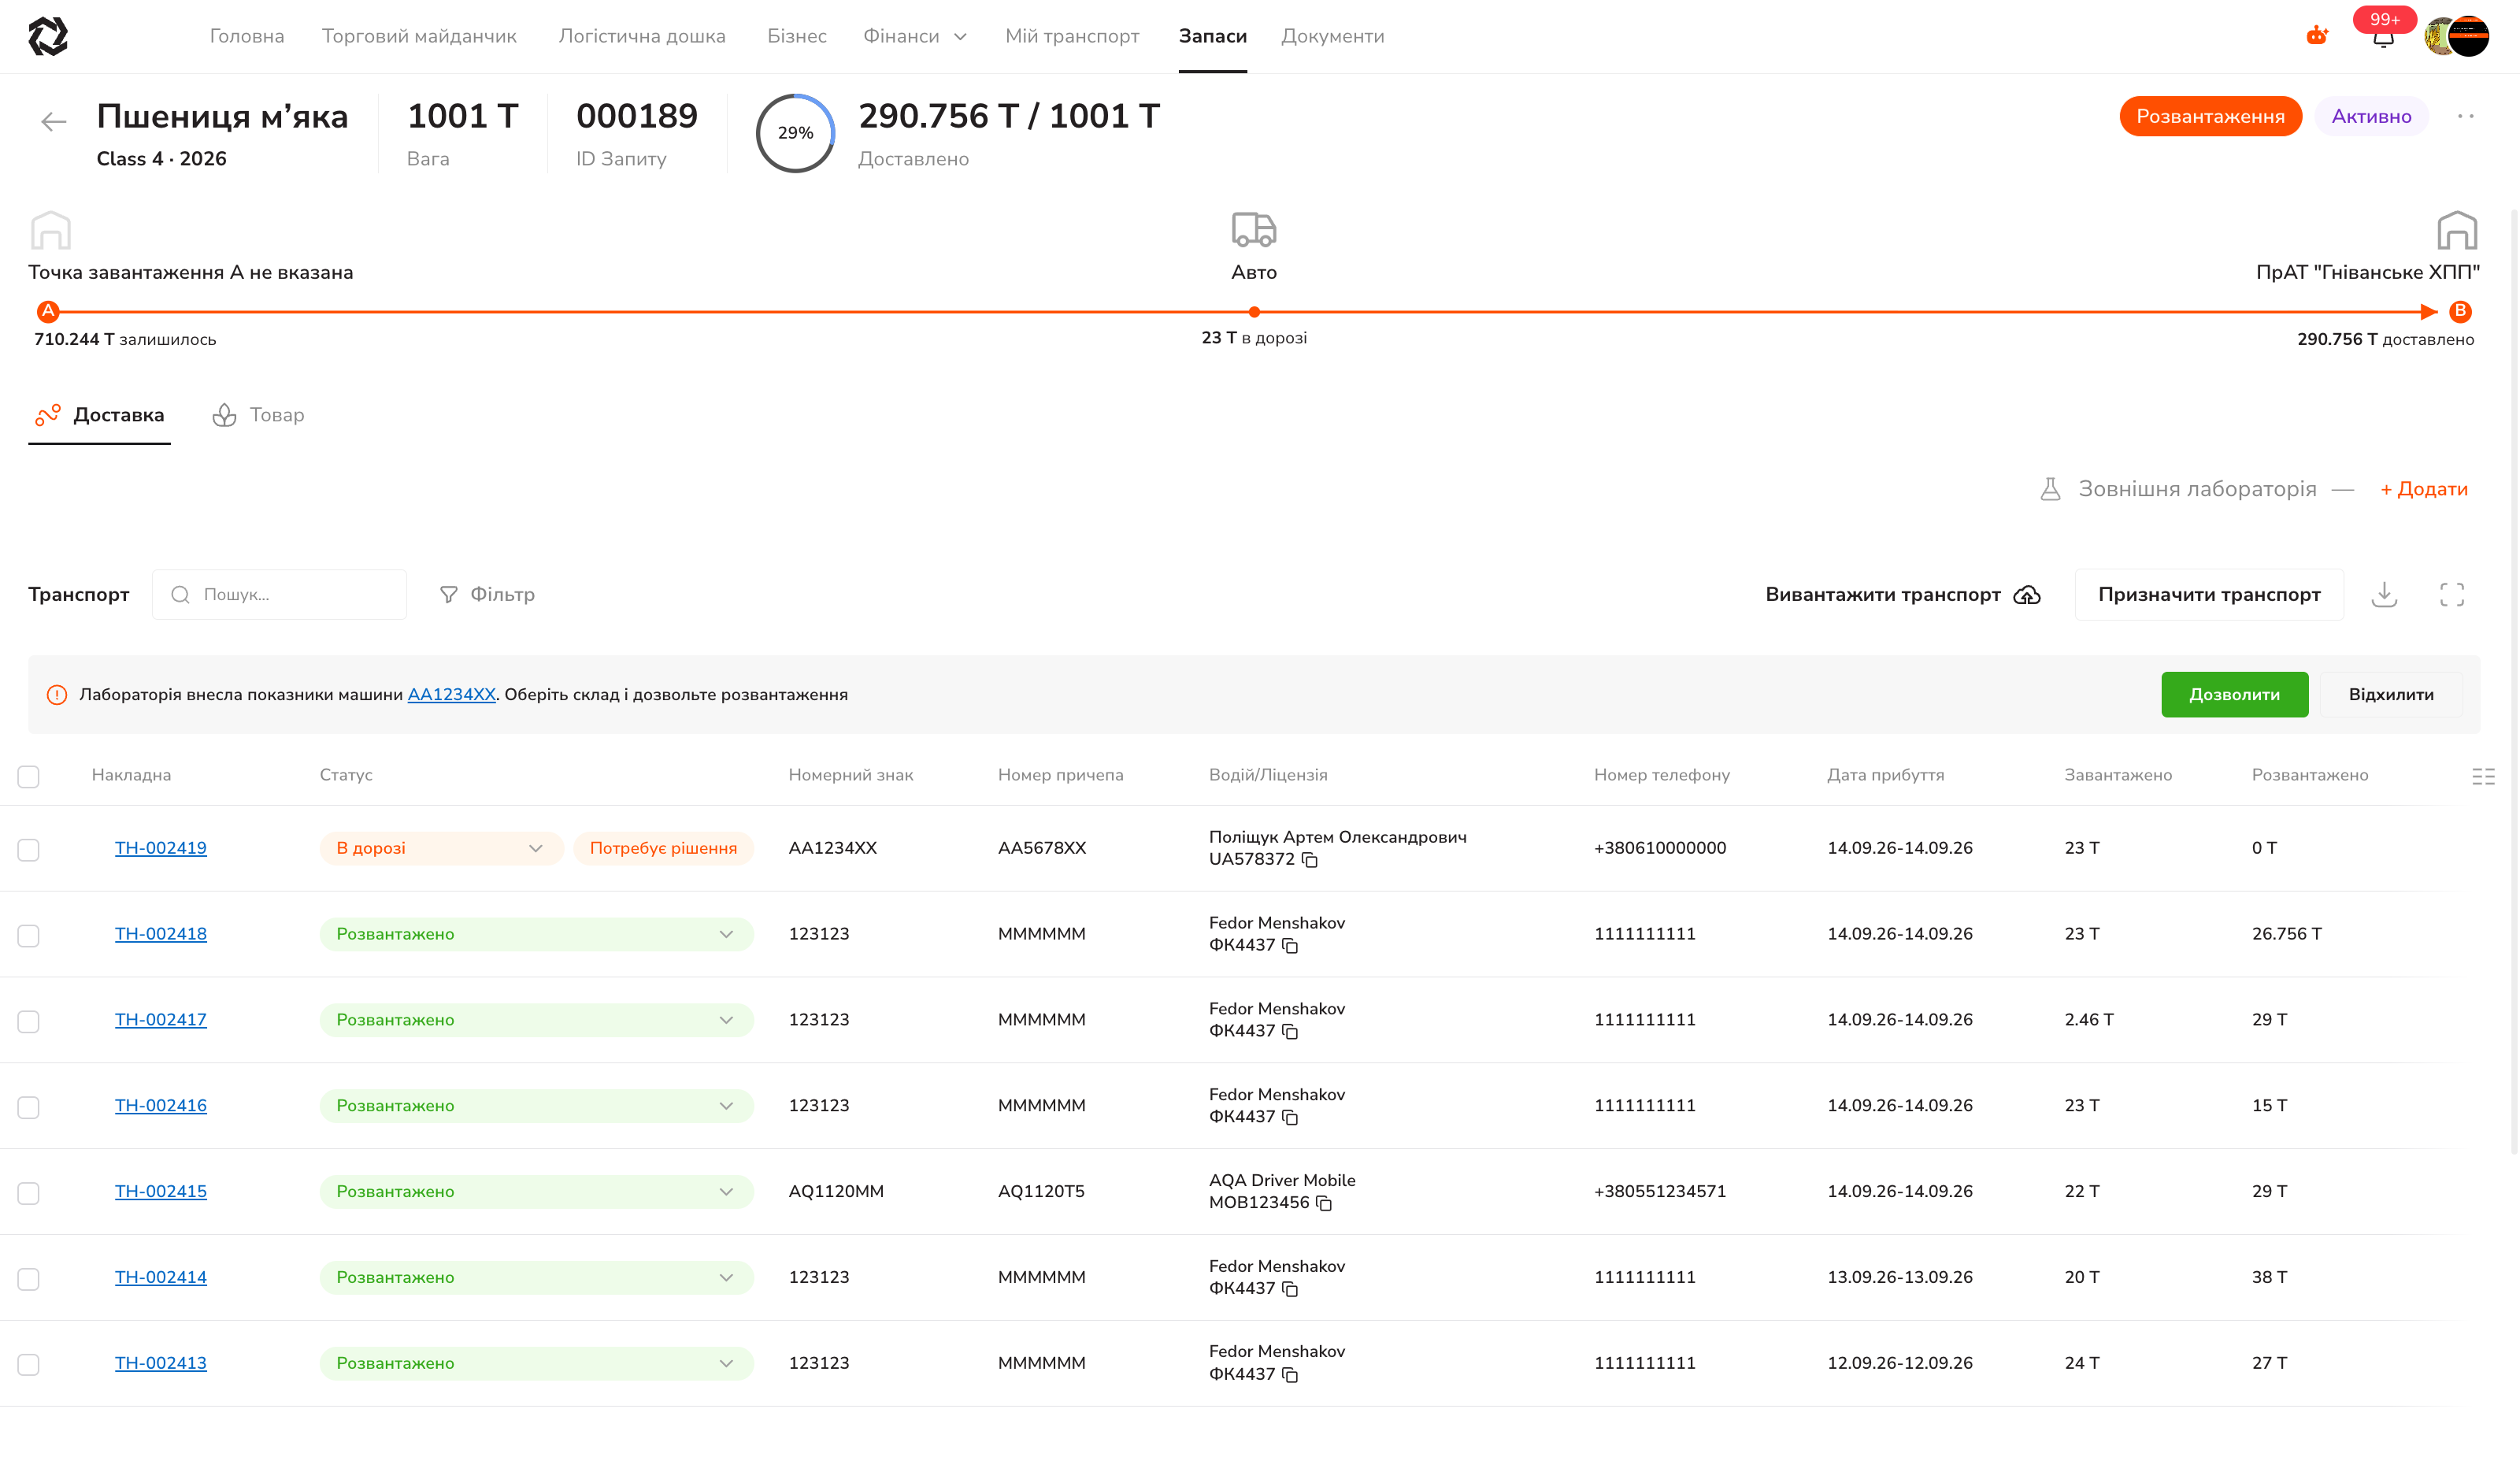
The A → B diagram shows three figures:
- remaining — plan minus delivered;
- in transit — tonnage of trucks already loaded and moving;
- delivered — actually unloaded.
The transport panel:
| Element | What it does |
|---|---|
| Assign transport | Nominate a single truck manually |
| Upload transport | Bulk import of trucks from Excel |
| The ↓ icon | Export the request’s voyage register to Excel |
| Search, Filter | By plate, driver, status |
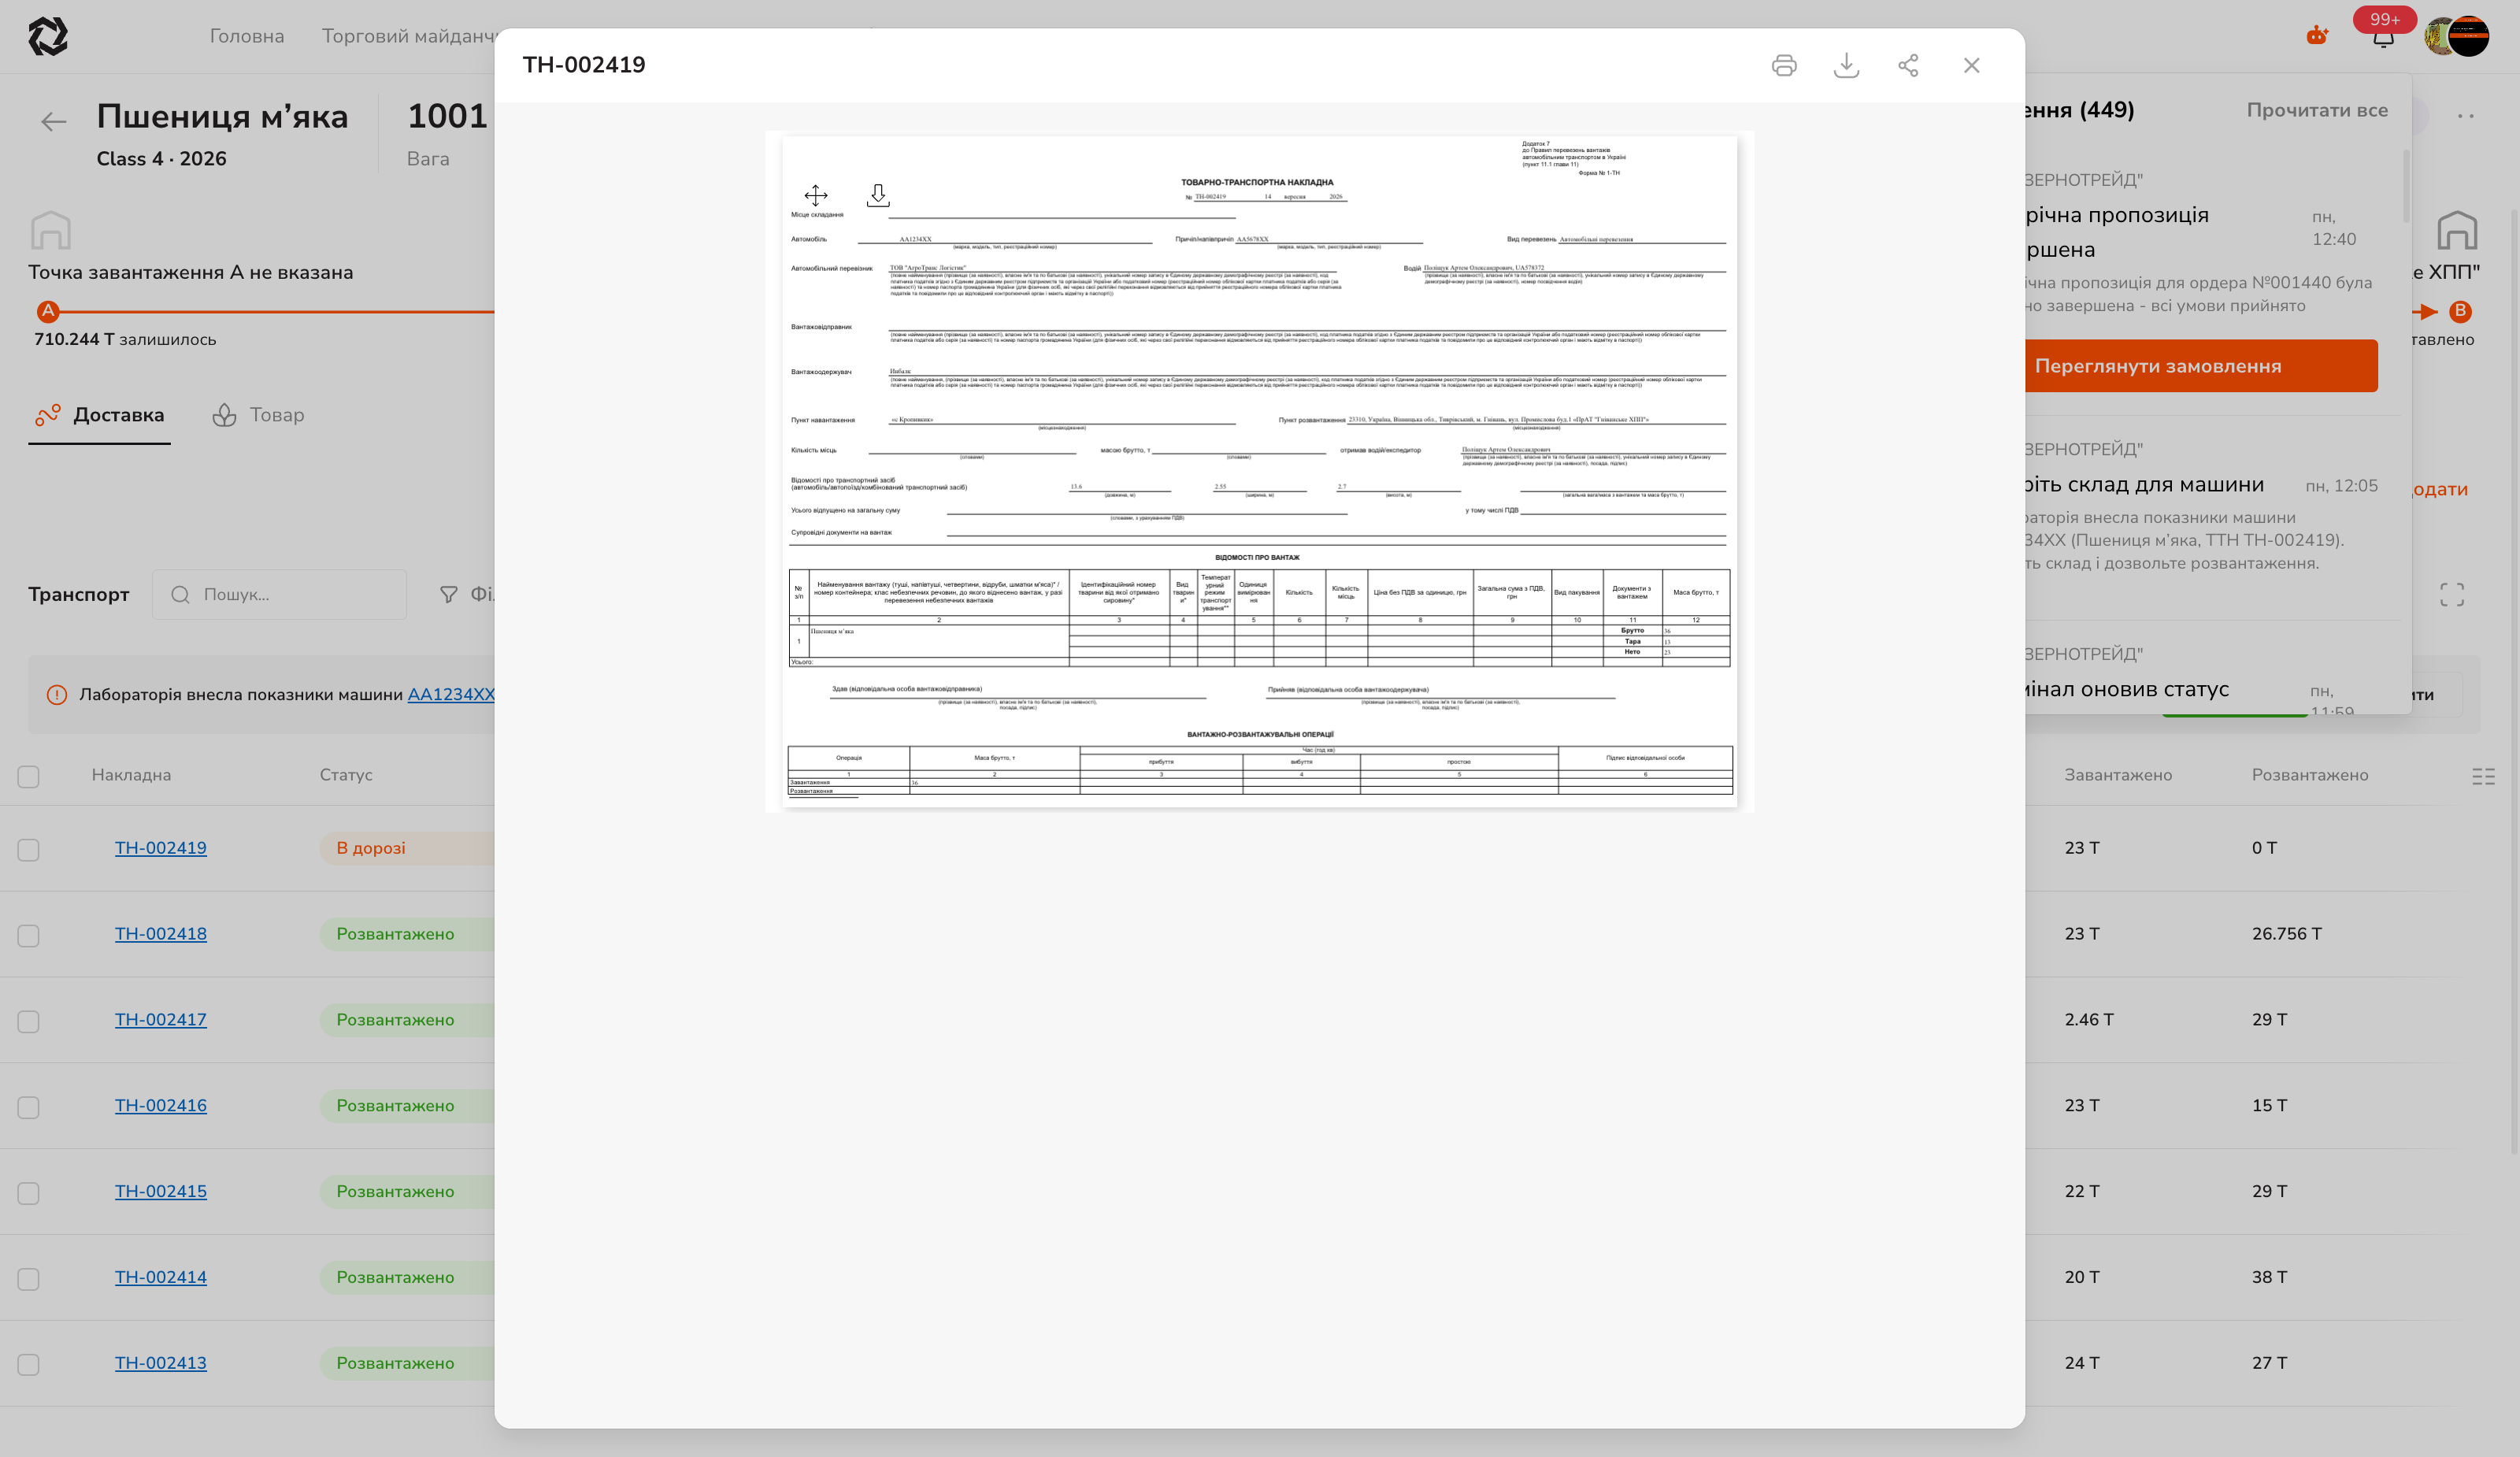
| Waybill number | Waybill preview with print and download |
Nominating a voyage
The “Assign transport” button. Two tabs: Truck and Rail. Required fields are marked with an asterisk.
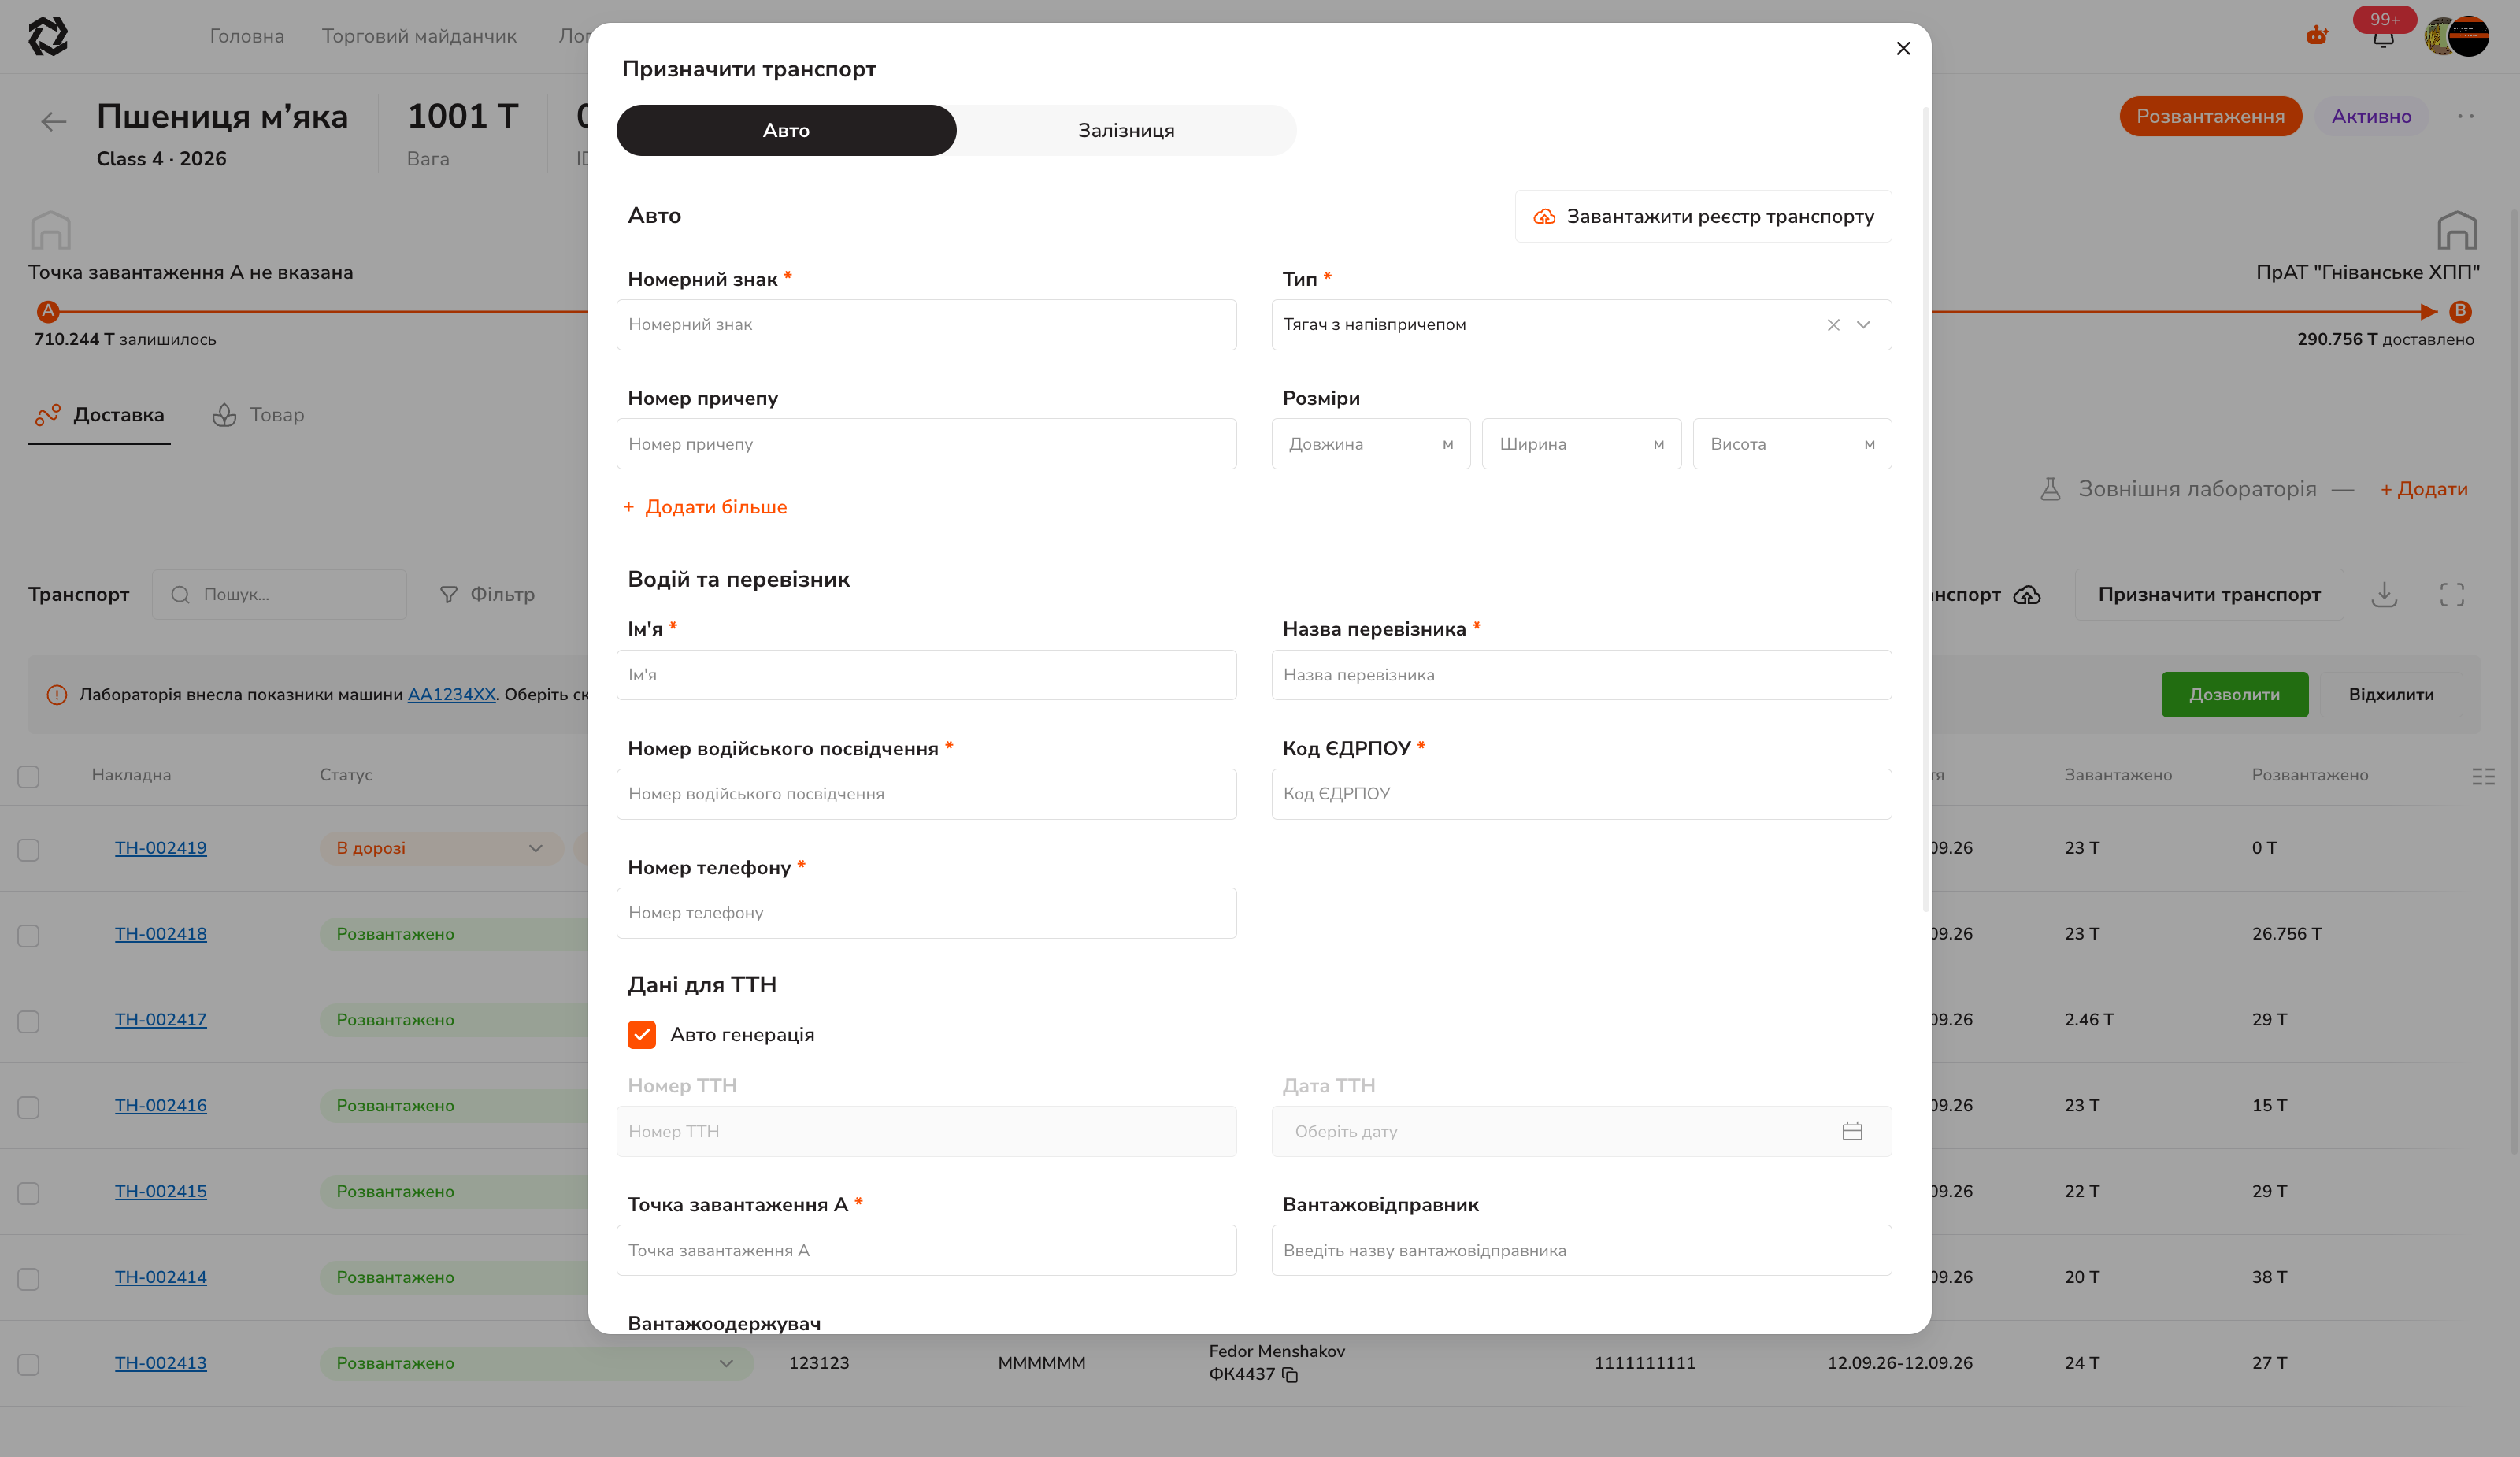
Truck — plate number, type (e.g. “Tractor with semi-trailer”). Trailer number and dimensions are optional.
Driver and carrier — name, carrier name, driving licence number, EDRPOU code, phone.
Waybill details
- “Auto generation” is on by default — the waybill number and date are produced by the system. Clear the checkbox to enter your own.
- “Loading point A” is always required, even if point A was left empty in the request.
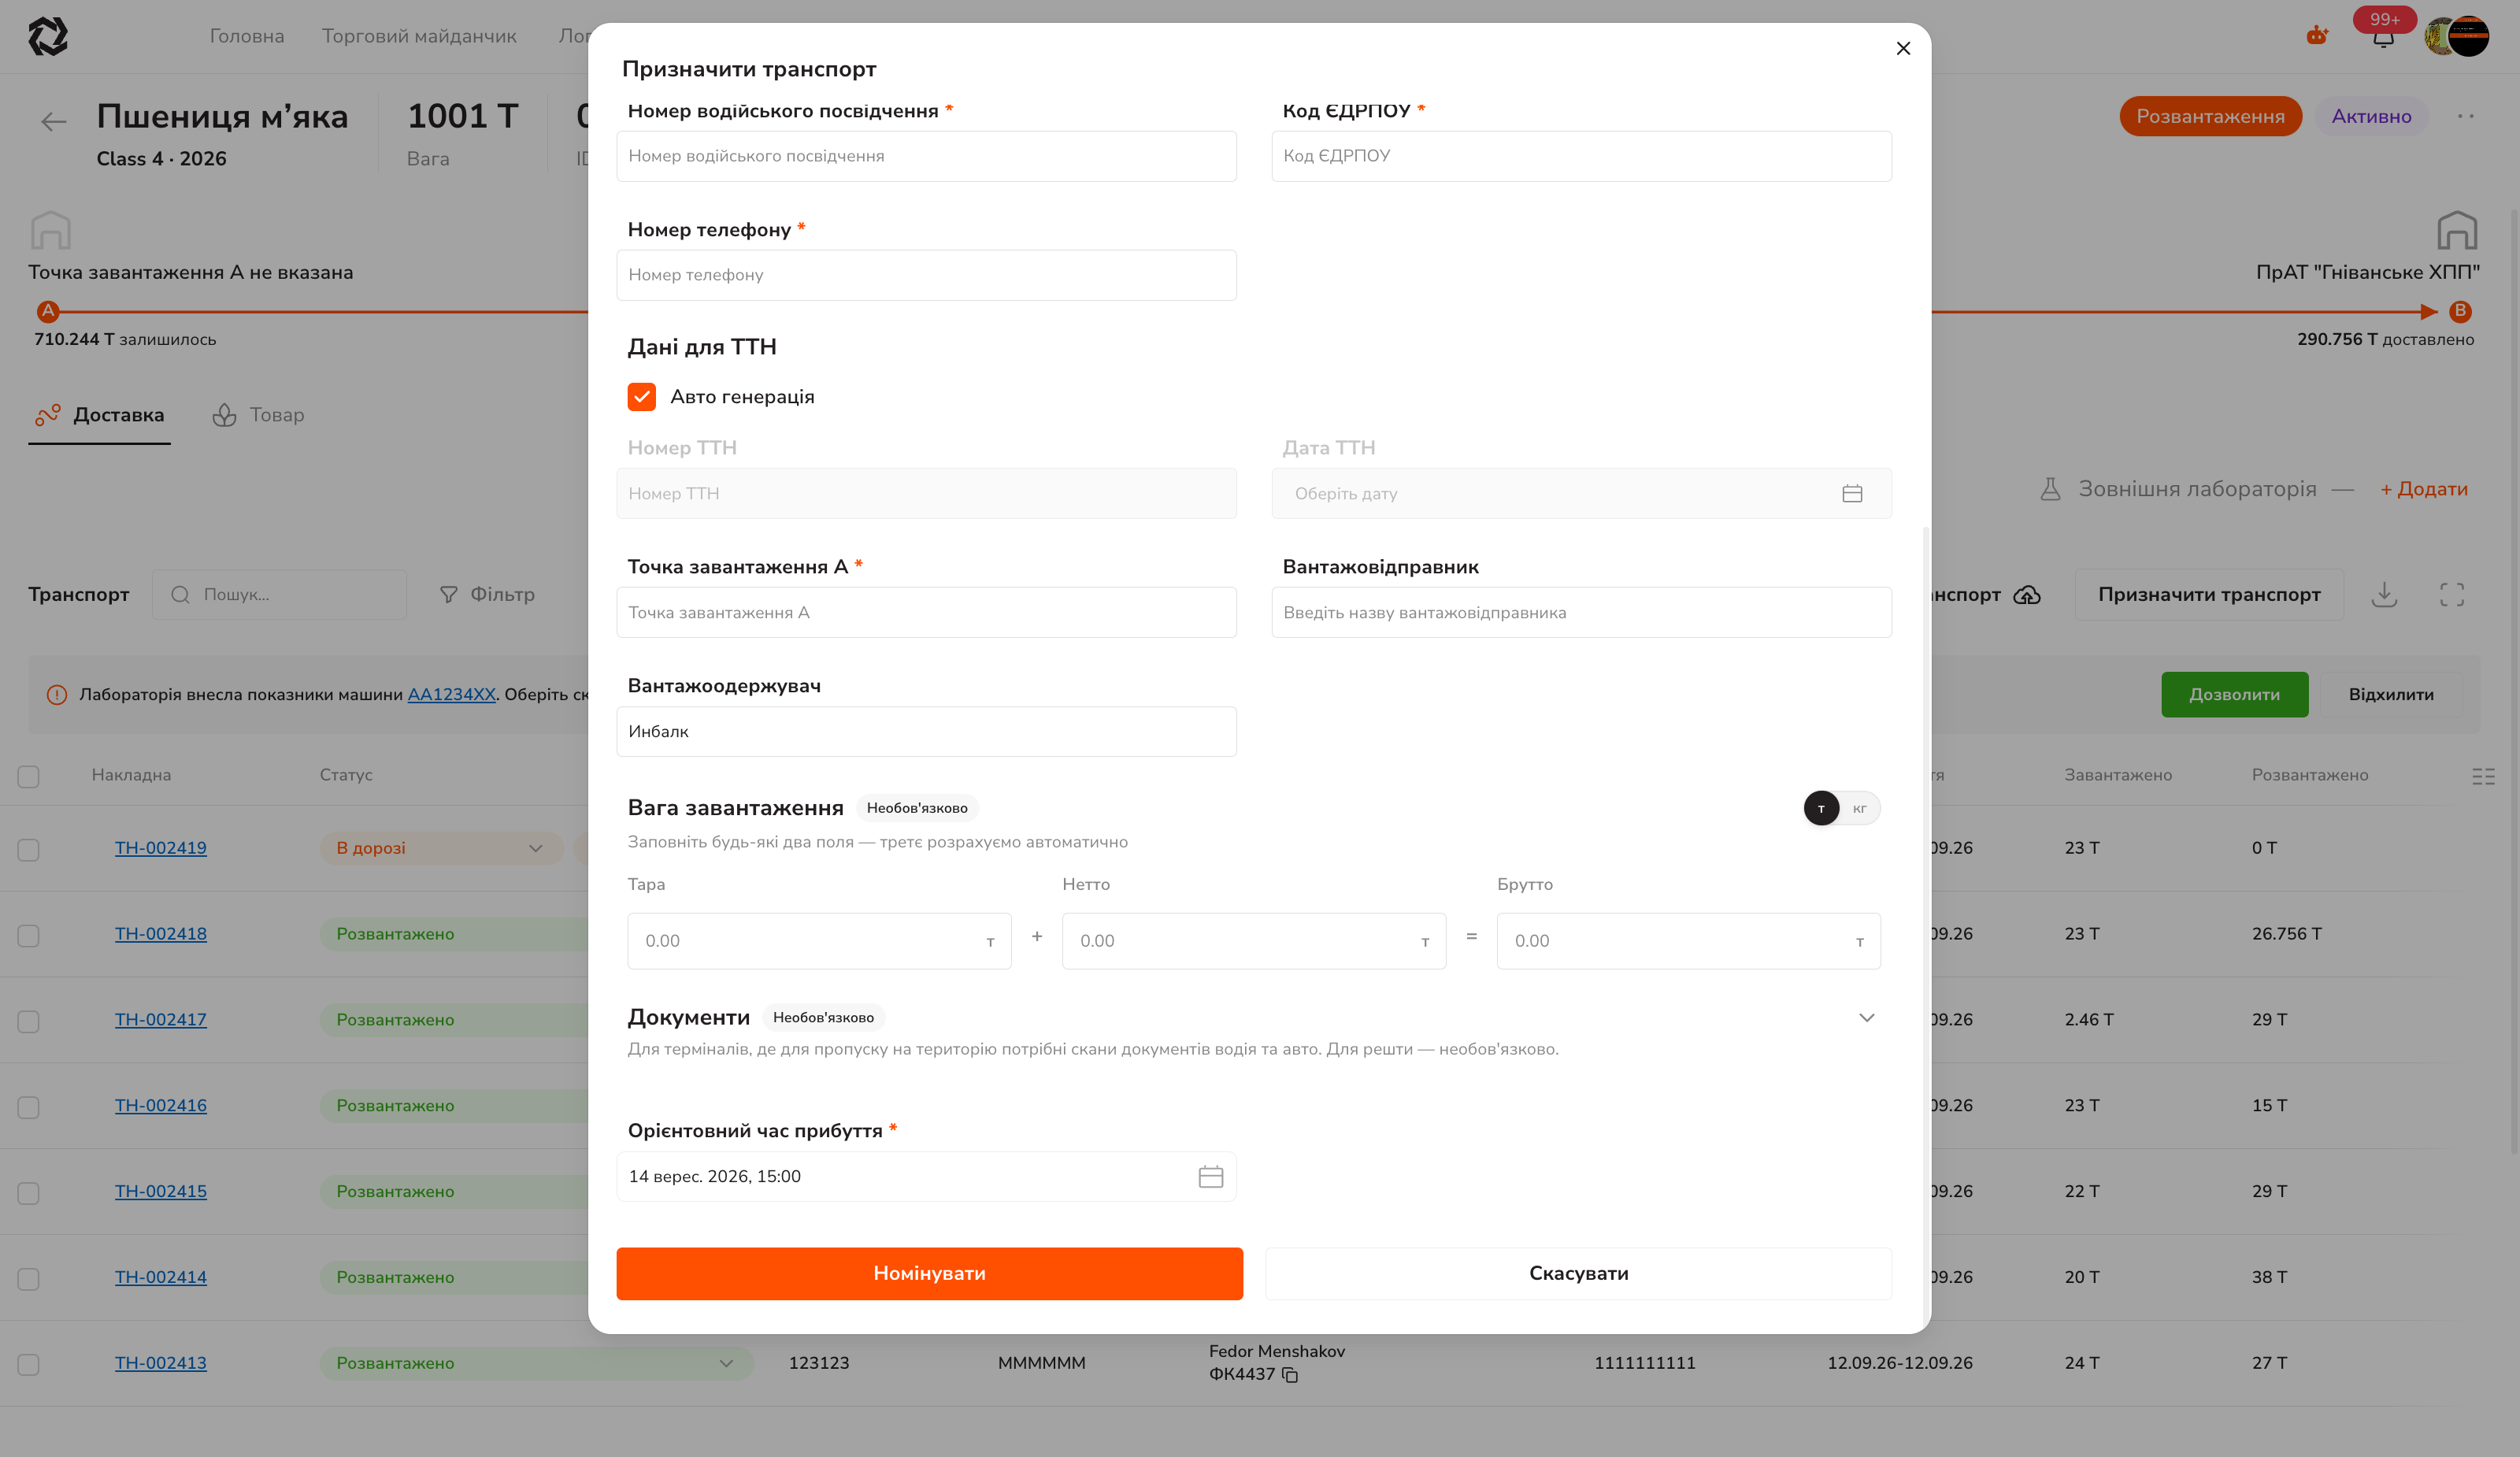
Loading weight (optional) — fill in any two of the three fields (Tare / Net / Gross) and the third is calculated. The t / kg switch is on the right.
Documents (optional) — scans of the driver’s and the truck’s documents. Required for terminals that will not let a truck on site without them.
Estimated time of arrival — required.
The “Nominate” button. The voyage appears with the Nominated status, and a pass with the Scheduled status appears at the terminal.
Bulk nomination: “Upload transport” → Excel template → upload the completed file. The format is described in the hint dialog.
Voyage statuses
You and the terminal call the same moment by different names. The left column is what you see; the right is what the terminal sees at that moment.
| Moment | Voyage on your side | Pass at the terminal |
|---|---|---|
| Truck nominated | Nominated | Scheduled |
| Departed, loading weight entered | In transit | Scheduled |
| Arrived on site | In transit | At terminal |
| Sample being taken | In transit | In progress |
| Quality within limits | In transit | To weighing |
| Quality out of specification | Needs decision | Trader’s decision |
| You allowed it | In transit | To weighing |
| You rejected it | Returned | Returned |
| Weighed, visit closed | Unloaded | Completed |
The tonnage of a closed visit drops into the storage balance and the request’s progress grows.
Statuses you can set manually
Six values are available in the “Status” column of the voyage table:
In transit · At port · Unloaded · Returned · Rejected · Cancelled
The set narrows depending on the delivery terms (DAP, FCA) and your role in the deal.
The “Nominated → In transit” transition always opens the loading-weight dialog — it cannot be skipped.
Separately from its status, a voyage may carry the “Needs decision” badge — that is step 5 of the process.
Deciding on a truck
When a truck is waiting on you, an alert appears in the request card above the voyage table, and the voyage row gets the “Needs decision” badge.
| Reason | Alert text |
|---|---|
| The laboratory entered parameters, a storage must be chosen | ”The laboratory entered parameters for truck {plate}. Select a storage and allow unloading” |
| The terminal did not accept the truck for unloading | ”Truck {plate} was not accepted for unloading. Allow re-entry?” |
For several trucks the text becomes a group one (“Parameters entered for N trucks…”), and the alert gains “Allow all” / “Reject all”.
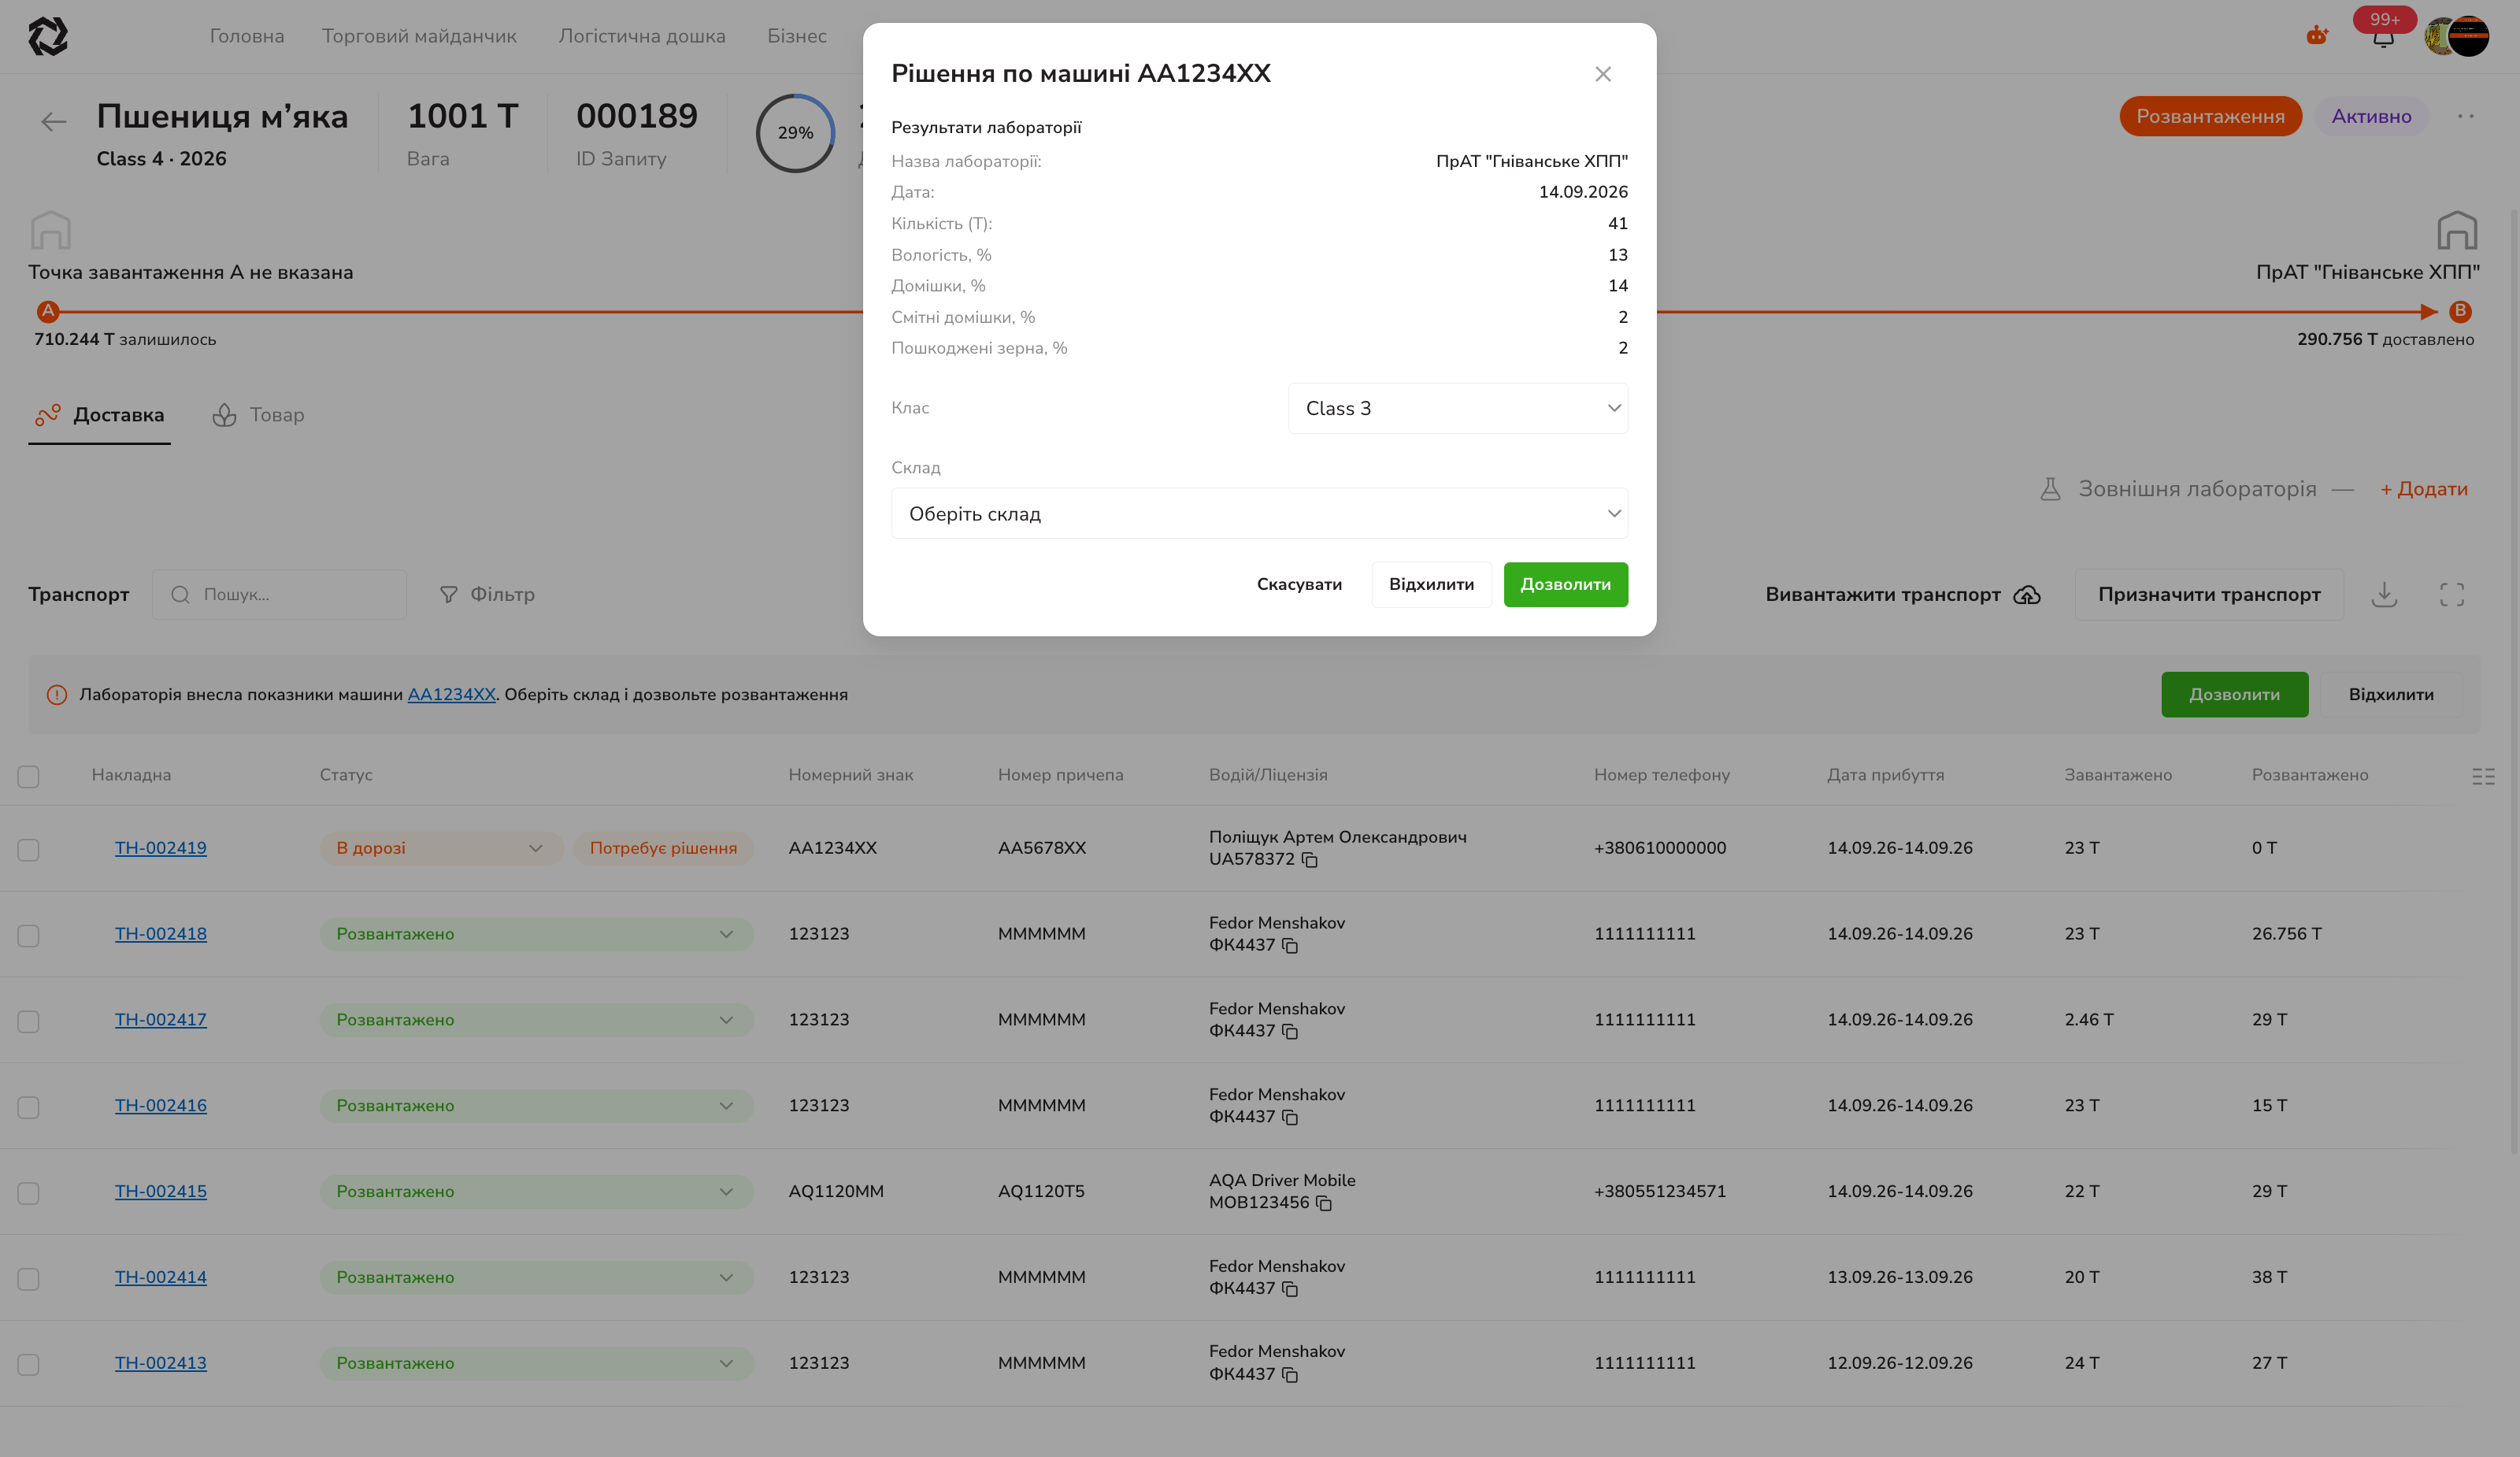
- Laboratory results — the laboratory’s name, the date, the quantity the samples were taken from, and every parameter entered.
- Class — the one assigned by the laboratory. You can change it if you disagree.
- Storage — where to unload. Required: without it the “Allow” button will not work (“Select a storage to allow unloading”).
Allow → the truck returns to processing, the pass becomes “To weighing”, and the “Transport admitted” toast appears.
Reject → the confirmation “The truck will be rejected permanently and will not be able to return for unloading”. The voyage moves to Returned.
For a group there is a single dialog: the chosen storage is assigned to every truck in the list, and each truck keeps the class from the laboratory. Requests are sent one after another — if some fail, you will see “Processed N of M”.
Notifications and Telegram
A truck standing at the terminal waiting for a decision is the most expensive idle time in the cycle. That is why the event arrives through two channels.
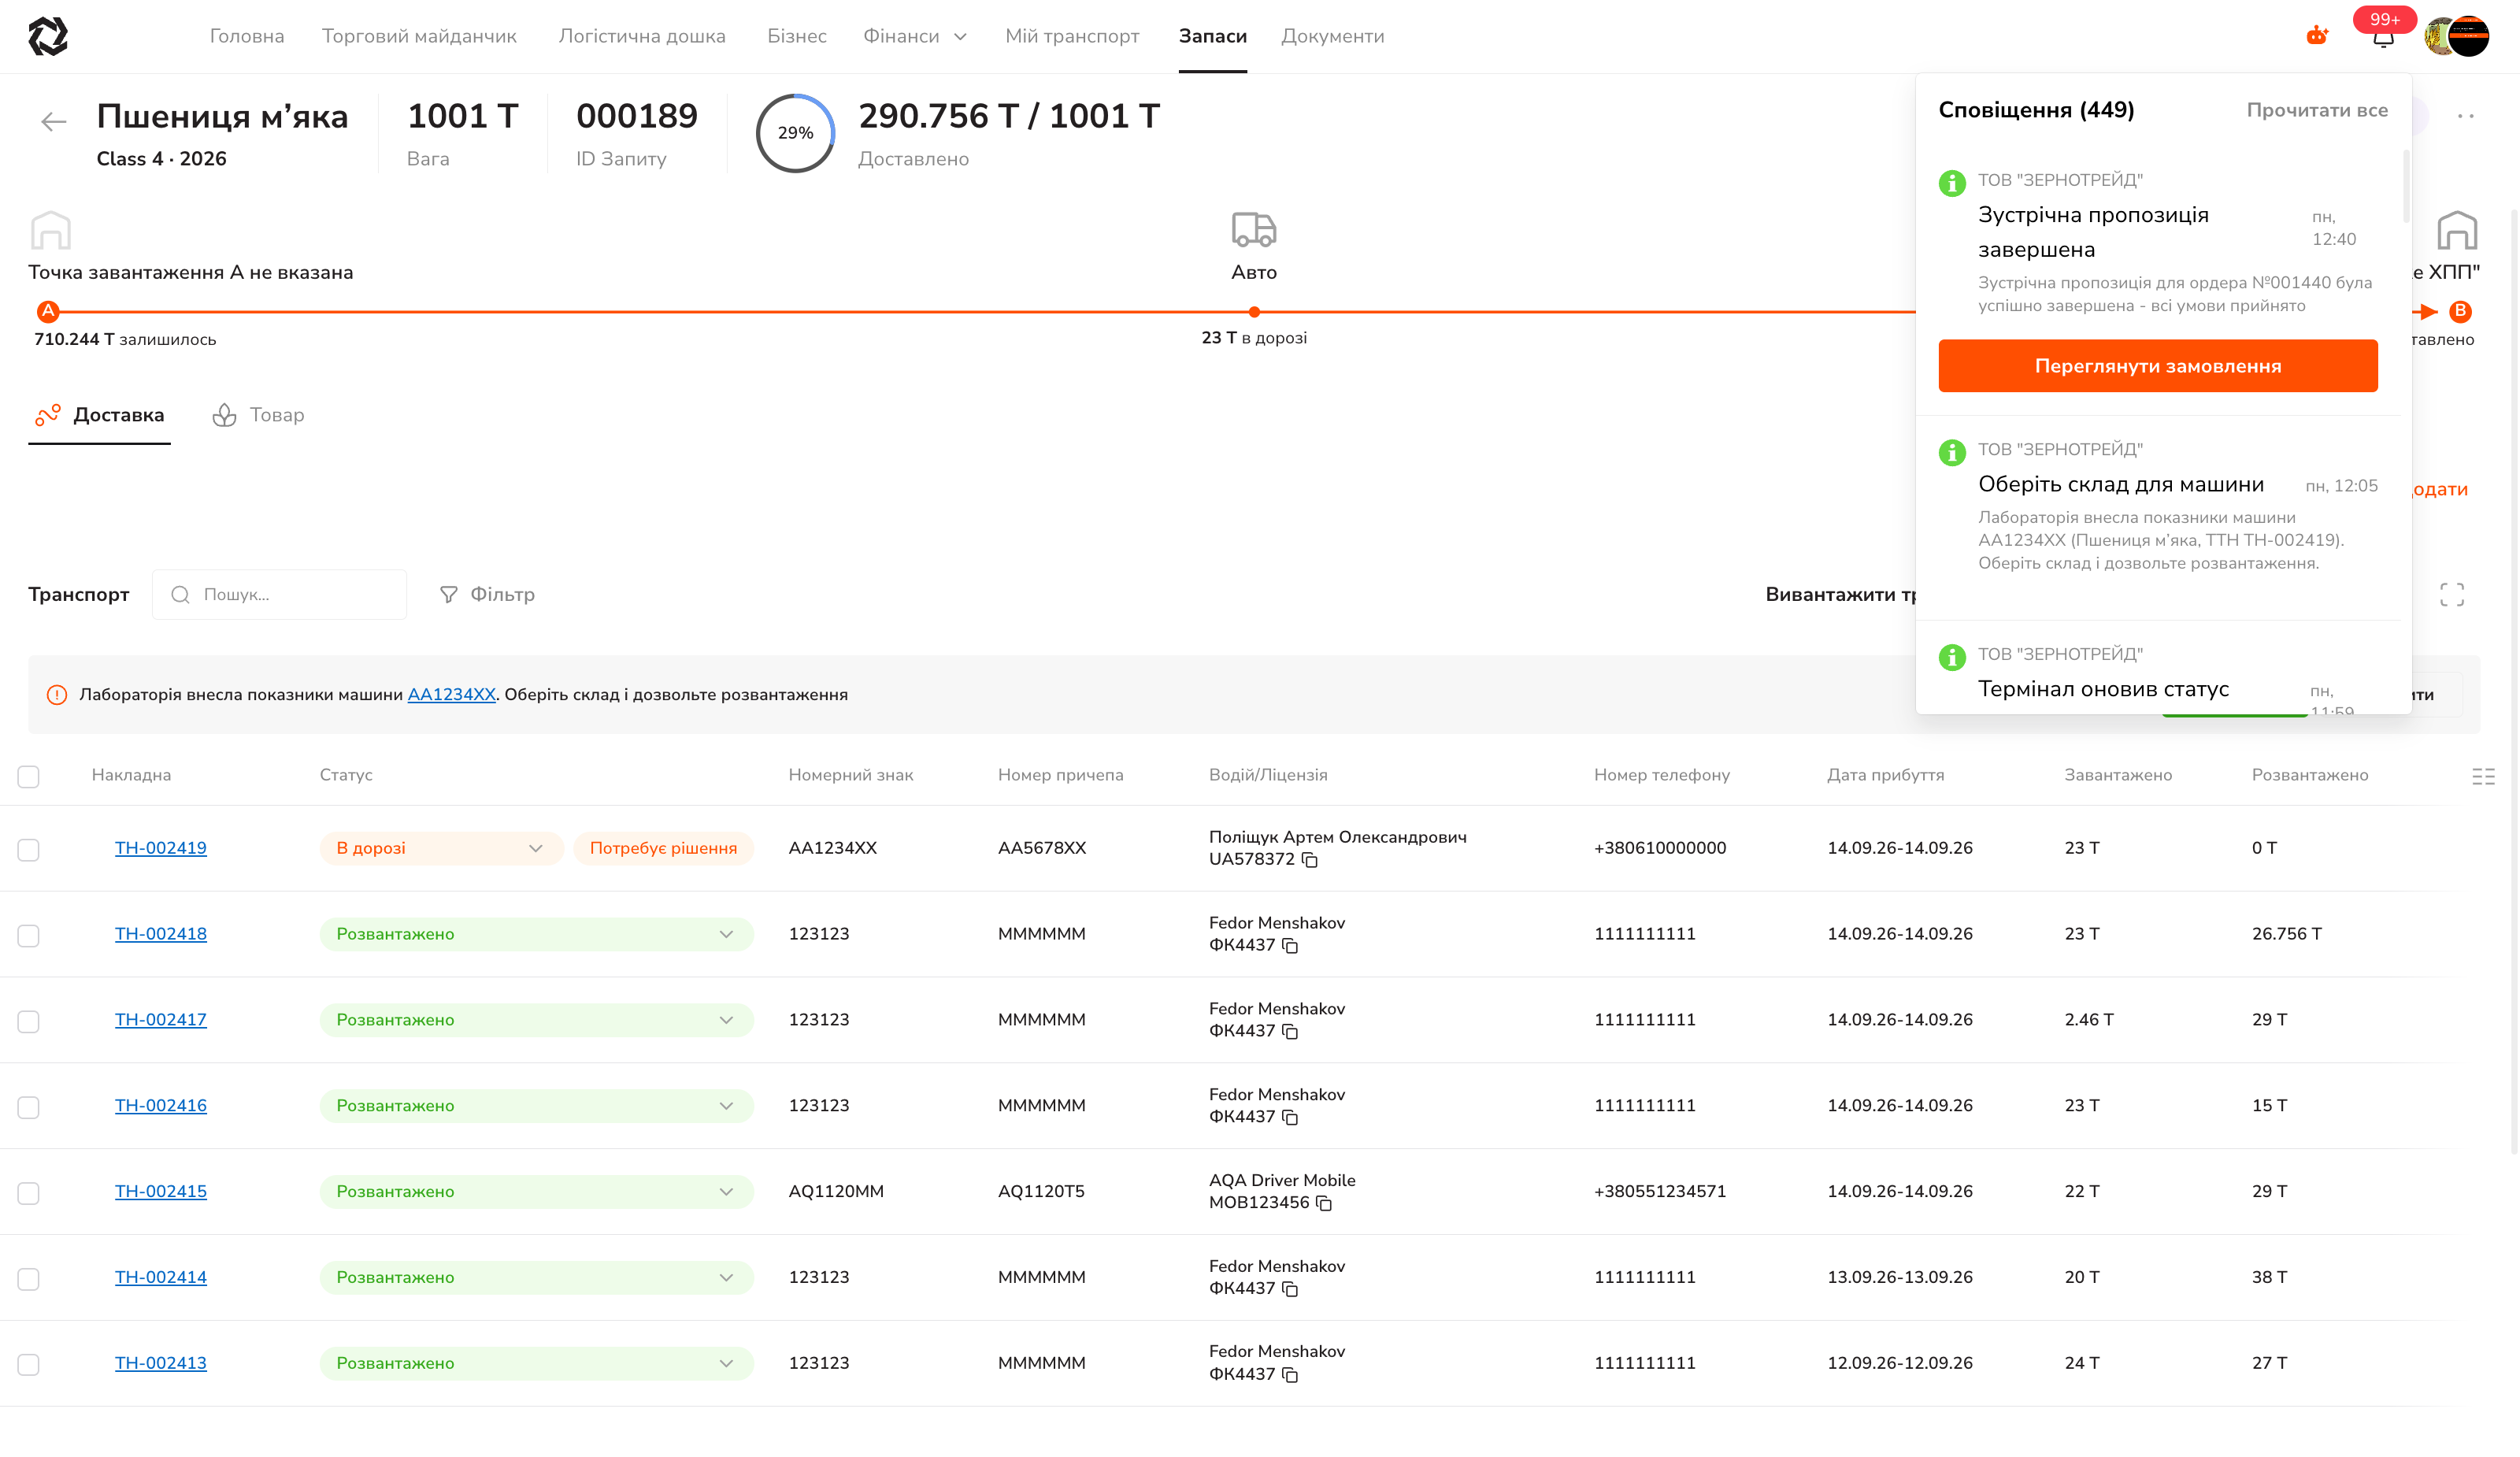
Typical messages: “Select a storage for the truck”, “The terminal updated the status”.
Personal Telegram
The link is made to your account, not to your company: the company does not enable it, require it, or see it. This is not the driver bot — that one is separate.
-
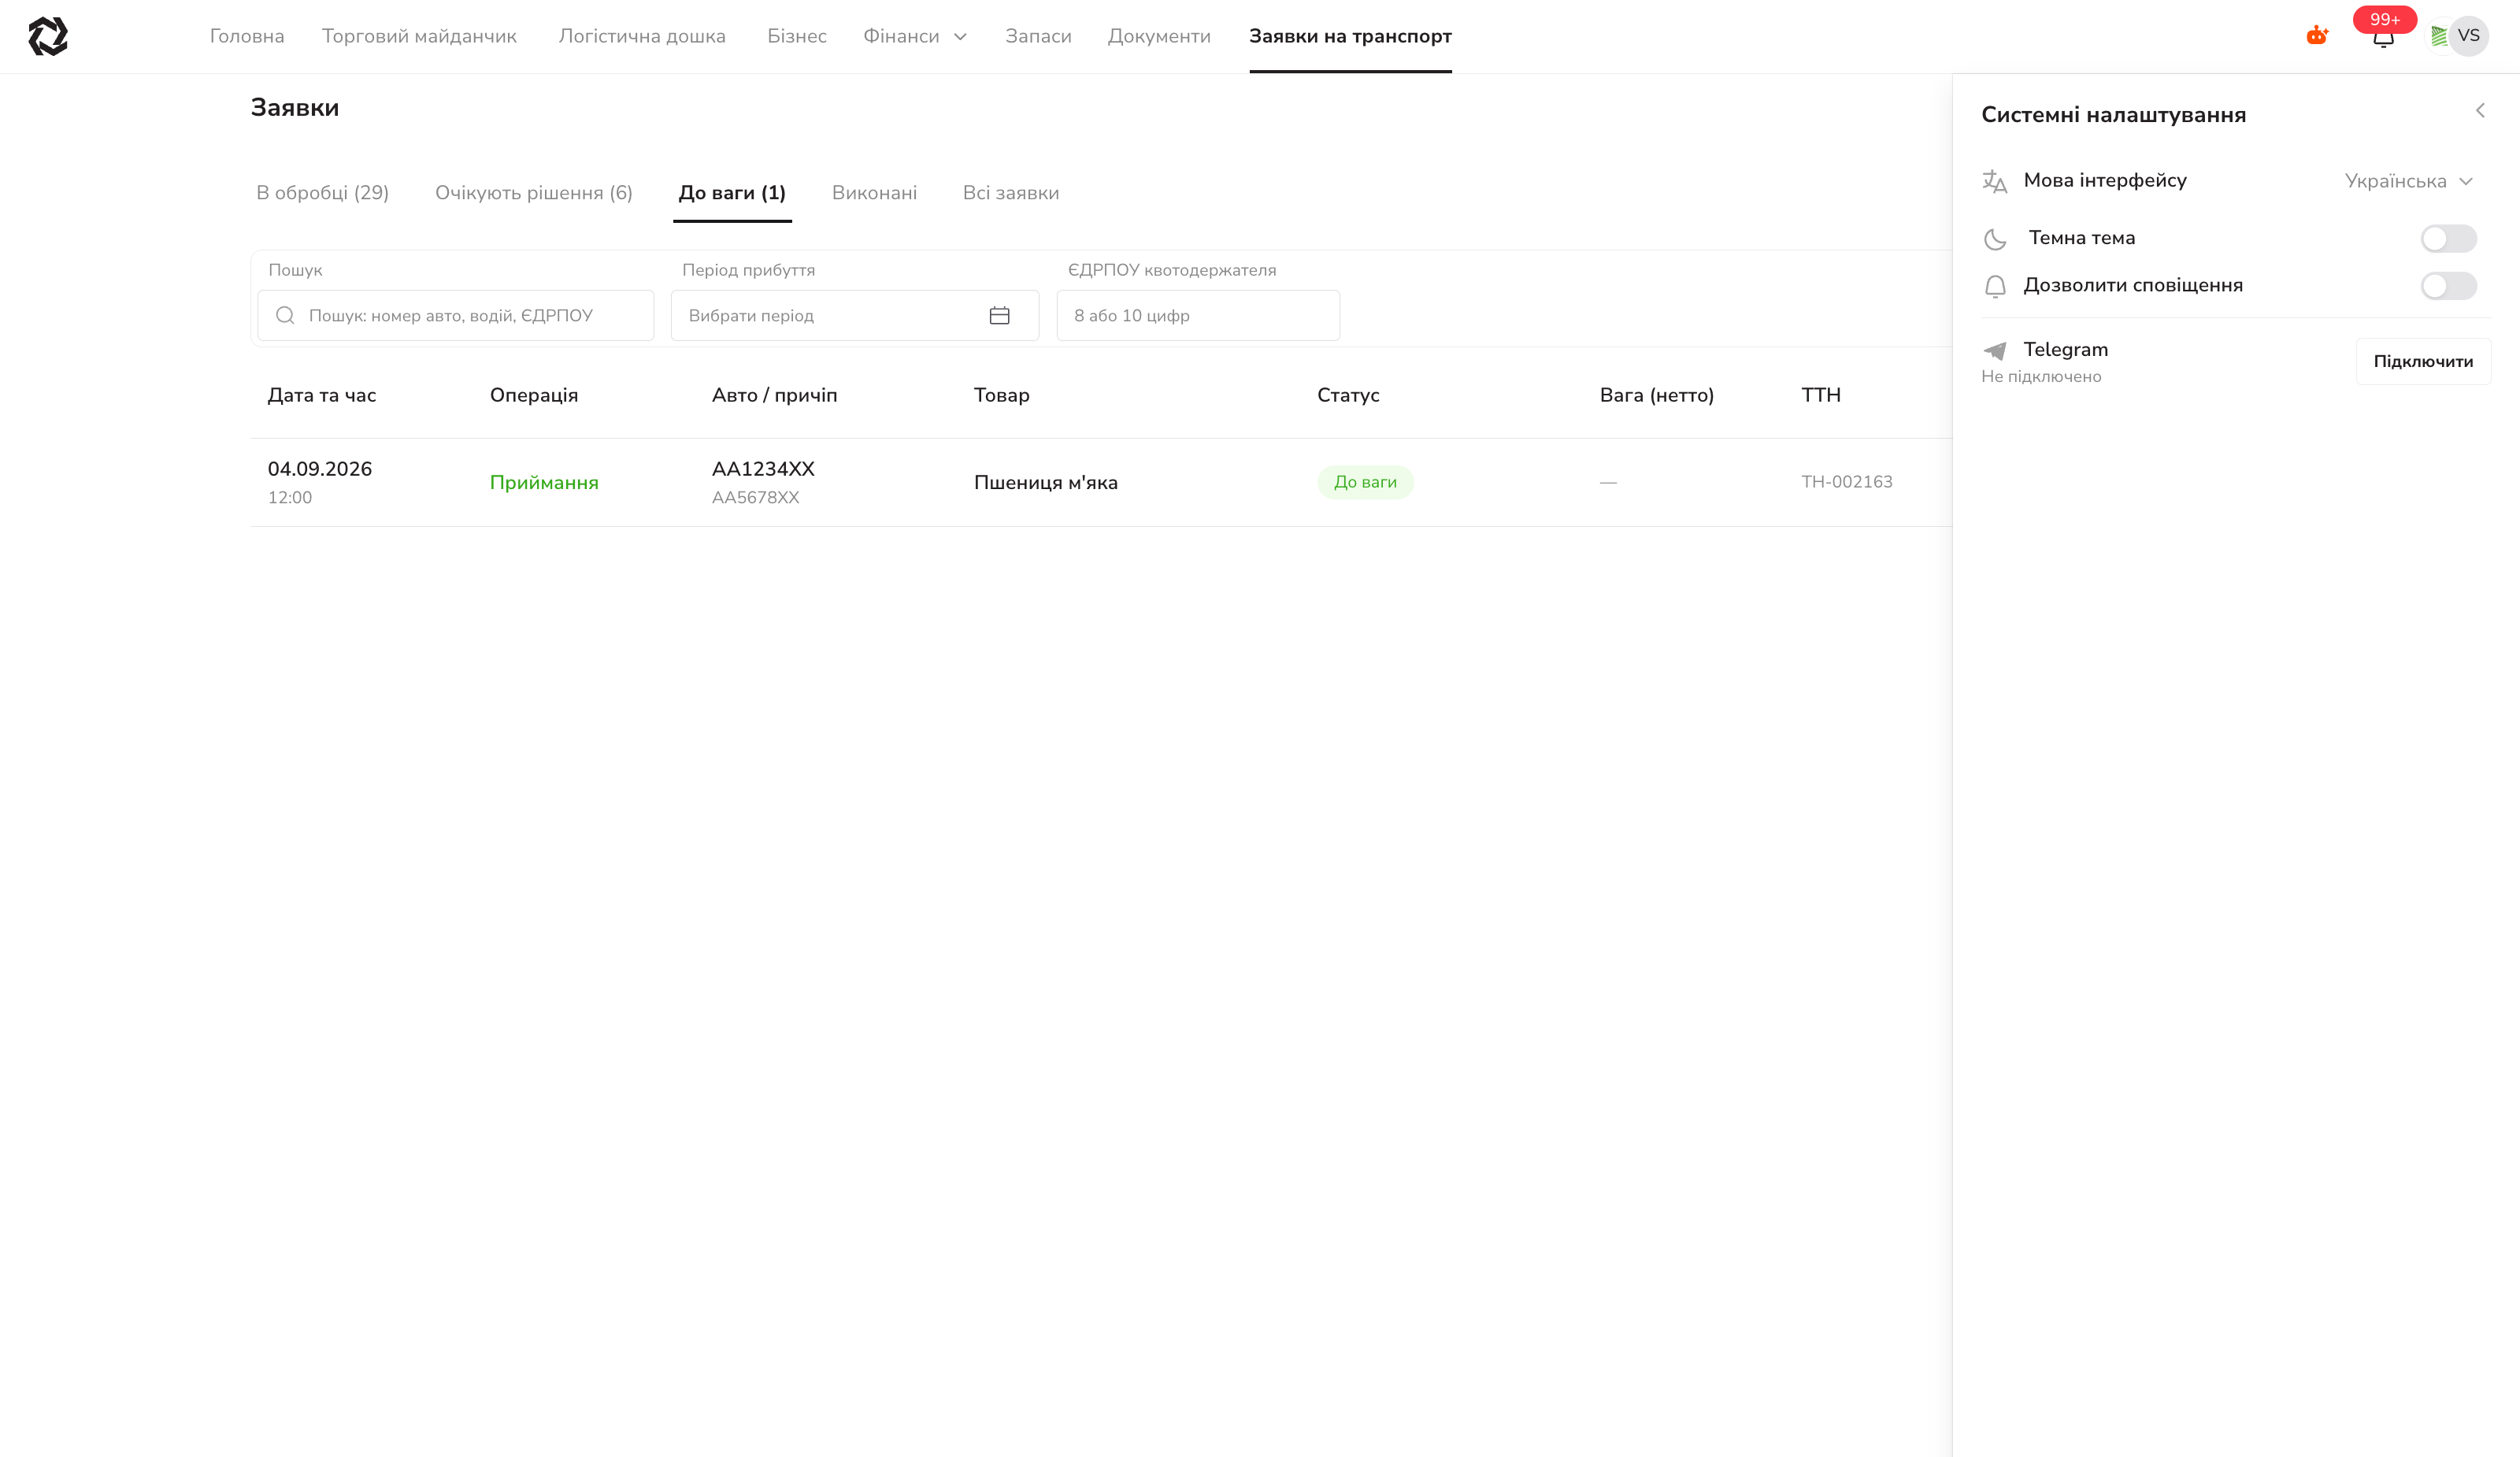
Avatar in the top right → “System settings”.
-
The Telegram block, state “Not connected” → Connect.
-
A one-time link and a QR code appear: “Open in Telegram” or “Copy link”.
-
Open the bot and press Start.
-
Return to the tab and press “I have connected — check”.
-
Done: your
@usernameand the connection date are shown, and the button changes to “Disconnect”.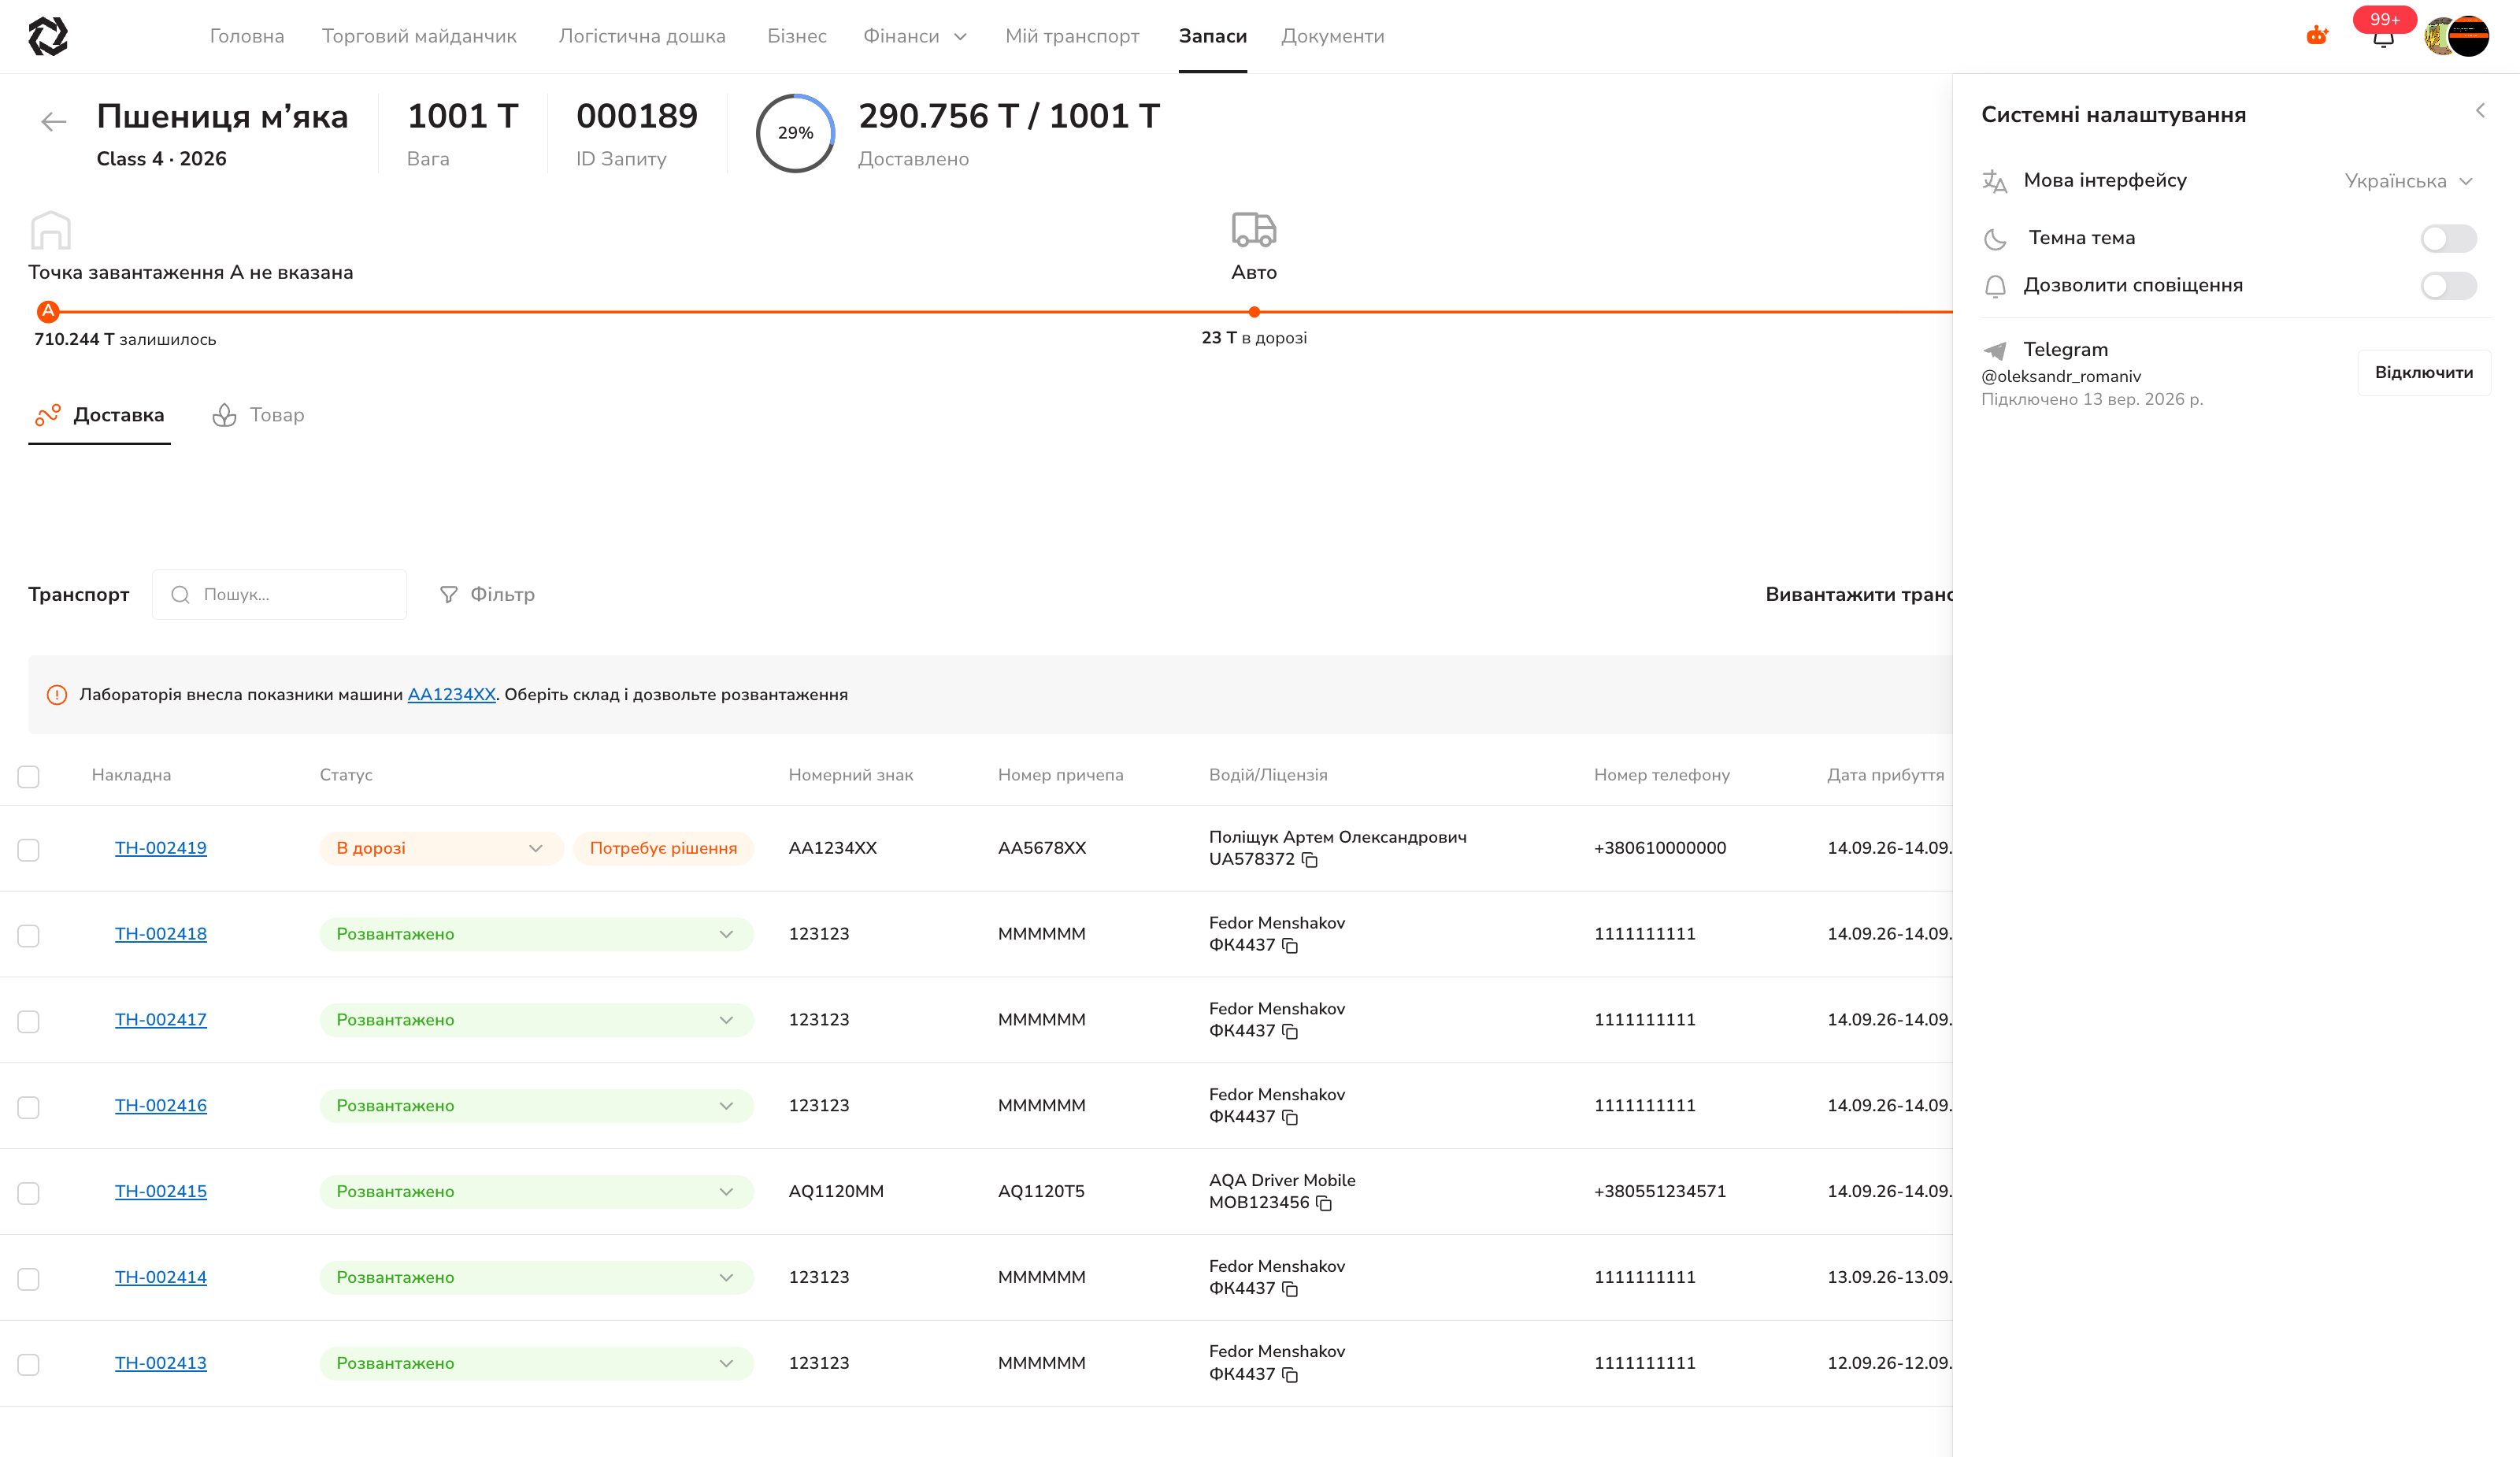
Details:
- The link is single-use and lives for about 15 minutes. Every press of “Connect” kills the previous one — an old tab with an old QR code will not work.
- To unlink: the “Disconnect” button on the web, or the
/stopcommand in the chat with the bot. The web state catches up on its own. - Confirmation happens inside Telegram and the web page does not learn about it by itself — the state refreshes when you return to the tab or press “check”.
Common questions
| Symptom | What is actually going on |
|---|---|
| I cannot find the “Allow” button | The alert lives inside a specific request card, above the voyage table. It is not in the request list — look for the request with the “Needs decision” badge |
| I allowed a truck but the storage is wrong | Until the terminal enters the weights it can change the storage on its side — your choice is shown there as the “Assigned by the trader…” hint |
| A request without point A will not take a truck | ”Loading point A” is always required in the voyage form |
| Tonnage is stuck in “Unallocated” | These are goods that have not yet been assigned to a storage inside the terminal |
| There is nowhere to enter the parameters | An external laboratory is assigned to the request — wait for the surveyor; the terminal will not enter them |